Documenting an Infrastructure With AI: pfSense, ESXi, and ntopng Into NetBox
An n8n workflow joins pfSense configs, vCenter VMs, and ntopng hosts into one NetBox inventory, so my AI SOC agent stops flagging my own lab as attacks.
TLDR: After engaging SamiGPT in my network, I was coming back to 200+ pending approval requests for FPs every day. The issue was that it didn’t know what was normal about my infrastructure. The solution was writing an n8n workflow that takes config files, vCenter data and ntopng data, joins them into one inventory, and creates and updates the objects in NetBox.
Background
In 2016-2017, I started with an ESXi on a PC. I used it for simple sysadmin exercises like running AD and network pentesting. After a while I needed more resources, so I invested in my first real server. I purchased it in 2019 and documented the upgrades. That was the start of the addiction.
That addiction started with Terraform, Ansible, and other IaC solutions. They gave me the ability to start deploying everything, developing, testing.. etc. With time, the number of servers and services grew, my type of work required additional skills to learn, and I got into building SaaS products, deploying more stuff publicly and maintaining all of that. I found myself with a large continuously changing infrastructure with many components but no documentation. Just to give you an idea of the mess, pfSense holds 276 rules, 104 aliases, 77 NAT entries and 199 DHCP maps, and the infrastructure has 180 VMs, 7 VLANs and a WAN.
I did attempt to document it in the past, but the docs drifted. With time, the live infrastructure got further from what I had written down. Maybe a big reason is that nobody else needed them, so I had no reason to share them. I always told myself I would get back to it one day and re-document everything.
The straw that broke the camel’s back came after I started using AI agents to triage my SIEM and EDR alerts (AI-SOC-Agent). I discovered that I was wasting a lot of time explaining things and documenting notes manually in a non-standard way in multiple places so that SamiGPT could understand the infrastructure while triaging. If you have seen that project, you will notice that it uses a knowledge base (KB skills) to fetch data about the infrastructure it’s working on. I used it heavily. But it wasn’t practical by itself. The “knowledge base” was just JSON files holding basic info about the infra, and they were not synced with any of the live data sources. It wasn’t the best appraoch for a changing environment. It was a bit annoying coming back to 200+ approval requests made by the agent every day, and all of them were just FPs. The causes were always the same. The agent flagged traffic from my C2 practice network, CTF and pentest zones as real attacks. It also flagged Tailscale clients connecting to their VMs. It couldn’t tell rogue devices from the 199 DHCP maps. It had no idea which hosts were disposable and which ones mattered (vCenter, ESXi, NAS, Nessus, the SIEM, etc.). Most of that was in my head and was not provided to the agent in a good way.
An idea came to my mind, maybe I can just give an AI read access to all the data sources I have and ask it to write me something sustainable that does the documentation based on the changes made on vCenter, pfSense, and the traffic passing through the routers. Then I can improve it manually when needed. This is what started this whole workflow. Hopefully someone will benefit from this and start following similar steps.
The rest of this post covers what I gave the AI read access to, and how it turned out.
Note
This post is written for a human to follow. The steps below are meant to be completed manually to create the read-only access, which can then be provided to your agent to handle the actual setup. Once the access is ready, you can prompt your way through the rest of the setup.
Workflow
n8n workflow
I decided to have pfSense post its config to n8n, let n8n pull data from vCenter and ntopng, do the processing, and run it as a scheduled task to update the docs daily/weekly/monthly.
The built workflow does the following:
- Inventory sync: Re-pulls vCenter and ntopng data on a schedule.
- Config ingest: Receives the redacted pfSense config file.
- Drift check: Compares live state against NetBox.
- Sync: Updates NetBox.
Yup, that easy.
pfSense config.xml to n8n
- Add an HTTP receiver in the n8n workflow.
- Write a simple Perl script to
- Copy
config.xmlinto a safe place on pfSense. - Run redaction instructions to remove sensitive strings such as tokens and passwords.
- Post
redacted-config.xmlto n8n.
- Copy
- Add the script as a cron job on pfSense.
Here is an example of that script.
OR install the REST API package on pfSense. I wouldn’t recommend that since it’s not officially supported by Netgate yet. That’s not what I did but it’s an option if you are feeling frisky.
vCenter
When it comes to vCenter, the workflow only reads. It opens a session, lists the VMs, reads each VM’s NICs and guest details, and closes the session. The following are the steps you need to follow to create a read-only user on vCenter:
- Create the user in the SSO domain. In the vSphere Client: Administration > Single Sign On > Users and Groups > Users, pick the
vsphere.localdomain, and addnetbox-ro. - Give it a role. A new SSO user can’t see any inventory until it has one. Right-click the vCenter in the inventory tree > Permissions > Add. Pick
vsphere.local,netbox-ro, the built-in Read-only role, and tick Propagate to children (I missed the “Propagate” part and it didn’t work, so don’t). - Log in to the vSphere Client as
netbox-ro. Open a VM’s Actions menu.
ntopng
The workflow makes two ntopng calls, both GET: host/active.lua for the host list and host/data.lua for each host. The token goes in an Authorization: Token header.
An ntopng token belongs to a user, and a user has at most one. The token only works against the REST API. The GUI ignores it. So the read-only part is the user, not the token: make a non-privileged user, then generate its token.
- Add the user. Settings > Users > Add User. Username
netbox-ro, role Non Privileged User. - Generate the token. Settings > User > Edit
netbox-ro> User Authentication Token > Generate Token. Copy it once and put it where the workflow reads it.
Loading it into NetBox
The workflow should run periodically and only create and update objects. Nothing already in NetBox should be deleted.
Each run should do the following:
- Load the stored redacted pfSense XML.
- Parse it: interfaces, DHCP static maps, aliases, OpenVPN clients and servers, and the Tailscale package (
parse_pfsense.jsin my code). - Pull active hosts from ntopng:
/lua/rest/v2/get/host/active.lua. - Log in to the vCenter REST API and pull every VM with its NIC MACs, guest OS and hostname (
fetch_vcenter_nics.jsin my code). - Join everything into one inventory (
join_inventory.js). - Pull the ntopng details for each matched host:
/lua/rest/v2/get/host/data.lua. - Create the NetBox scaffolding if it’s missing (
ensure_foundation.jsin my code). - Upsert every asset (
sync_all_assets.jsin my code). - Post a summary message: inventory count, new VMs, new physical hosts, updated objects, errors.
The code can be found here and here is the workflow in n8n:
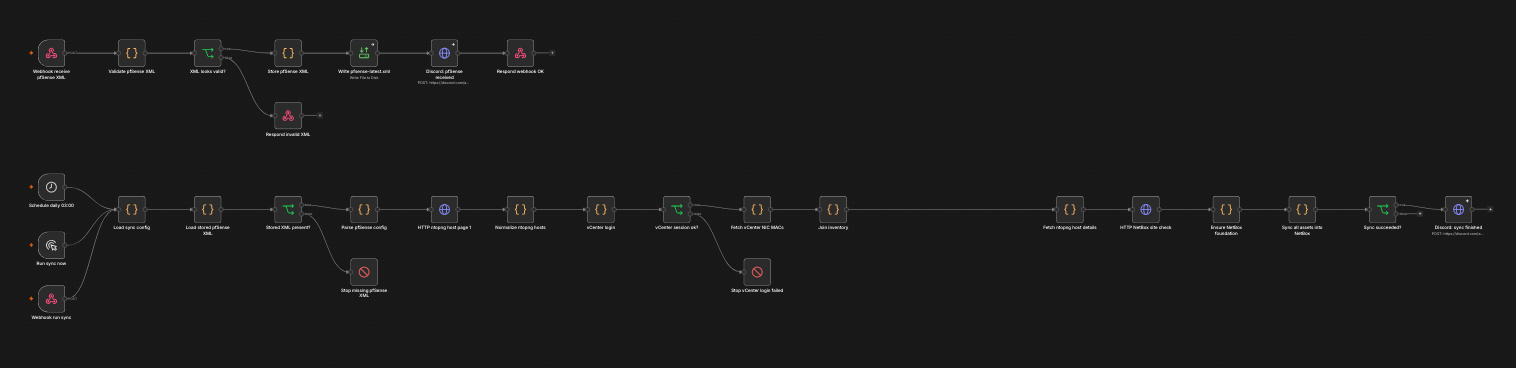
If you want more details about the workflow, I’m sure you can ask your agent and it will summarize and help with the setup.
What it doesn’t do
- It never deletes. A VM removed from vCenter stays in NetBox until I remove it manually.
- It knows nothing about trust tiers or purpose, so you will need to edit those objects in NetBox yourself. A short paragraph for each subnet will do. (At least for me)
The results
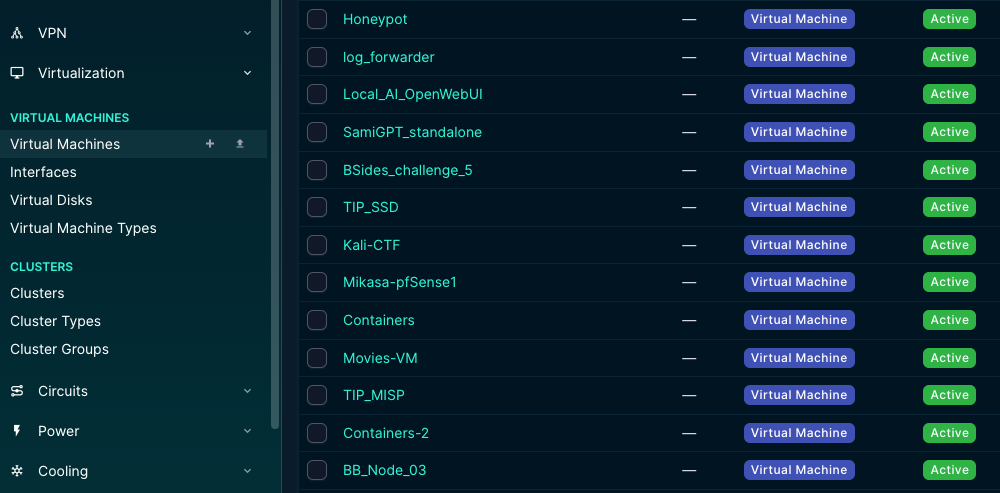
Now, I can keep track of things. My agent (the fun part) can query info about servers, understand the segregation, know what VMs have static IPs and which are random DHCP test VMs. It can look up which subnet an alert’s IP lives in and read the note I wrote for that subnet, so traffic from the C2, CTF, pentest and EASM zones has an explanation. It can check whether a MAC and IP pair has a pfSense DHCP map (those VMs carry the source:pfsense tag). It can read what ntopng last saw for a host (protocols, traffic volume, score) and whether the VM is powered on.. etc. If you are curious how it knows all of that, the answer is that I gave the agent access to a new set of NetBox skills that teach it how to work with and navigate NetBox. For more details about the skills, check v0.2 of the agent: SamiGPT.
Here is a slice of that inventory. It lists the VMs that the workflow added/updated from vCenter:
Another cool thing is that, with all that documentation, you can ask your agent to build a network topology, run a network threat model, and show what’s beyond the L3 layer like Tailscale at the application layer (Tailscale traffic doesn’t go through pfSense firewall rules so it’s blind spot but the config file so that’s a win).
A tip: I found that draw.io diagrams don’t get generated well by AI. For some reason, the XML files are hard for it to construct, so I found that the easiest way to draft a high-resolution network topology (it matters when you have 200+ nodes) is with Graphviz DOT files. For me, this was a game changer. Here is a quick prompt I use:
Use Graphviz DOT (`.dot`/`.gv`) to create a clear, professional network topology for [reason]. Include all relevant components, connections, zones, and labels. Keep it clean, organized, and easy to understand. Then render the DOT file as a high-resolution PNG with readable labels and good resolution. Output both the `.dot` file and `.png` file.
Finally, before starting, I did some quick research on how to resolve this with existing “wheels”. I found open-audit, which I think can be a good solution if you want to also have visibility on AD objects and policies, and maybe hardware too. The main con to me is Nmap. I didn’t want to run more active scanners inside the network since I’m already maxing out my bandwidth so I decided to keep it simple and go with a sync workflow.
FIN