Walkthrough: The detection and analysis of the ransomware incident in IRSeC 2021
TLDR; This post is a walkthrough of the detection and analysis of the ransomware incident that was deployed as an extra/hidden inject in IRSeC 2021. If you were one of the blue teamers in that competition and couldn’t analyze and recover from it, this walkthrough will help you understand how it works and help you learn how to recover the infected files.
I would not suggest executing the virus in an environment that is not a testing environment. This post doesn’t go through the safety requirements you need before running malicious files on your computer. Download the malware and test it at your own risk.
Investigation
After a couple of minutes of running the ransomware, 55 warnings/events show up.
When investigating warnings, we begin with the key questions. we start with the five W’s and one H; who, what, when, where, why, and how. That will help you understand the events and map the suspicious ones together.
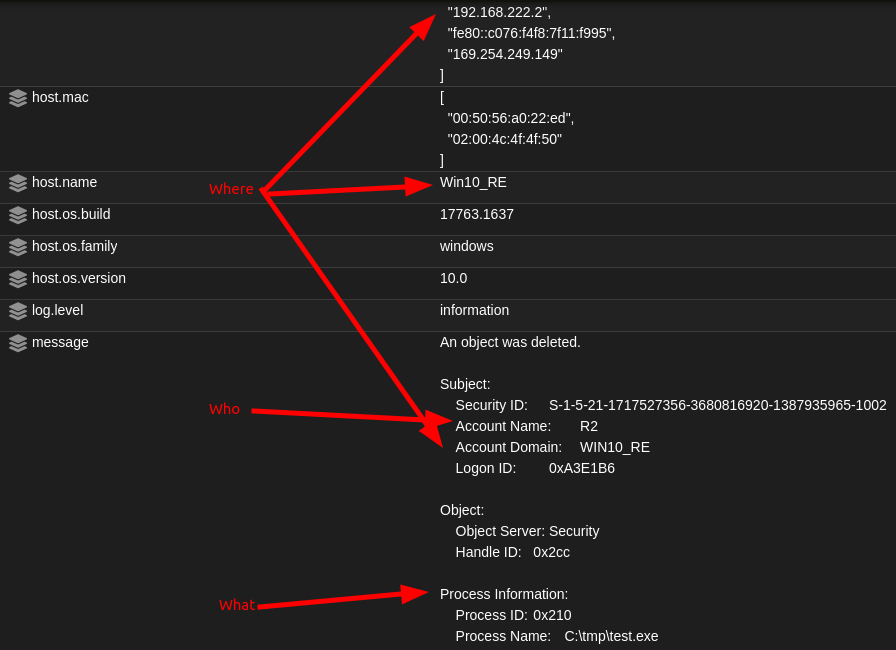
If we look at the alerts and answer some of these questions, we can have a good idea of what is happening behind the scenes. SO Hunt page shows many file manipulation events and other irrelative events occurring after the execution. We received more than 55 events of file deletion. Using the information we get from the file deletion events, we can find other events that are related to events found in the beginning and map everything together.
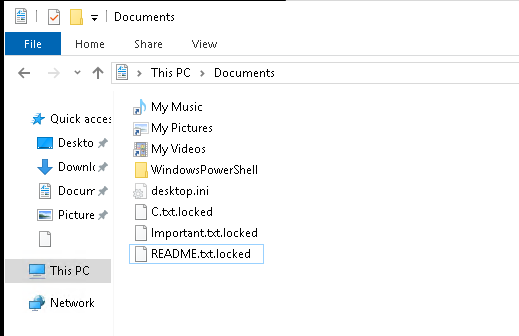
The malware that was launched was dropped at C:\tmp\ and named test.exe. test.exe has deleted multiple files, as shown on the Hunt page. If we login into the Windows VM where the incident happened, we will also see that the files now end with .locked extension:
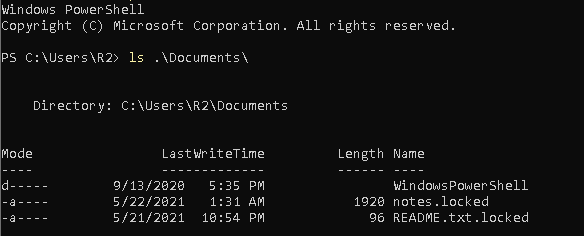
This indicates that the VM got infected with ransomware. According to the events, the ransomware should be in /tmp, therefore let’s locate and copy it for examination.
Basic Static Analysis
For the static analysis part, I suggest using CFF to find all the following:
Malware Fingerprints

Using some of the hashes, we can now search for the malware online. A good efficient way to search for it is by using Google. You can find very useful commands in SANS’s Google Dorking cheat sheet:
https://www.sans.org/security-resources/GoogleCheatSheet.pdf
When I search for the malware’s hash on Google, Google doesn’t show any result.
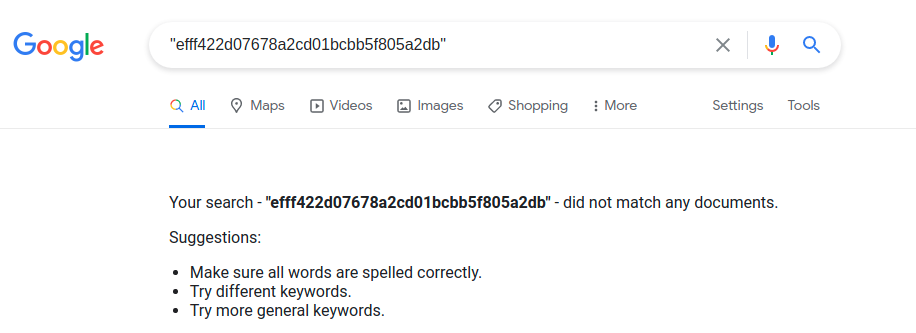
That means that it probably has not been scanned before (as of the time of writing).
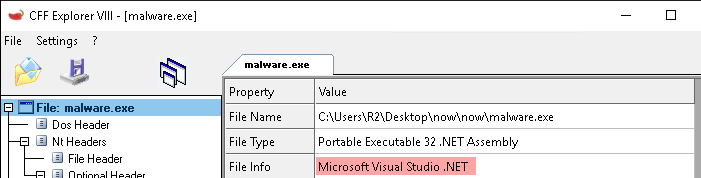
Portable Executable File Format
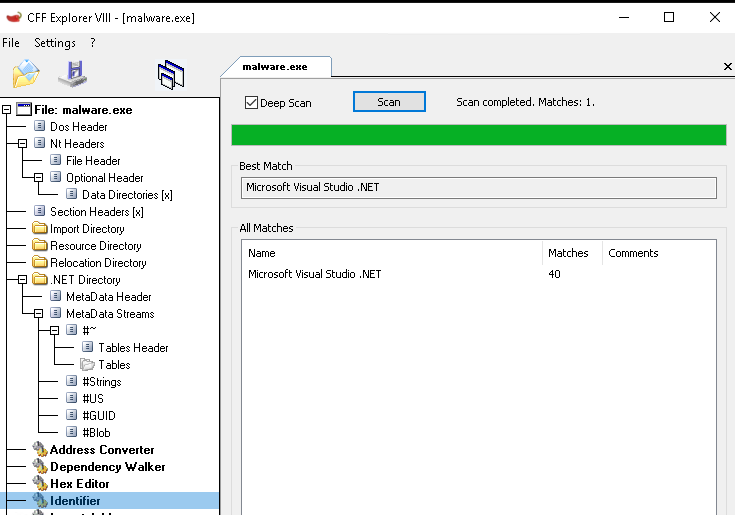
We can find the file format using CFF:
Finding Strings
The typical way to find strings is using string.exe, as almost every malware analysis book says. I personally don’t like to run strings on binaries since I don’t see it as an efficient tool. It fills the command line window to the point that strings start disappearing, and you cannot “grep” strings without re-executing the command again. Therefore, again my go-to lightweight tool is CFF.
However, the binary doesn’t have any unusual find paths, registry keys, and domains. It appears to be just a normal .NET binary.
Packing and Obfuscation
CFF couldn’t find any type of obfuscation implementation even though it looks like it has been obfuscated.
“Detect It Easy” was able to find that the malware uses “Confuser(1.X)” as shown below.
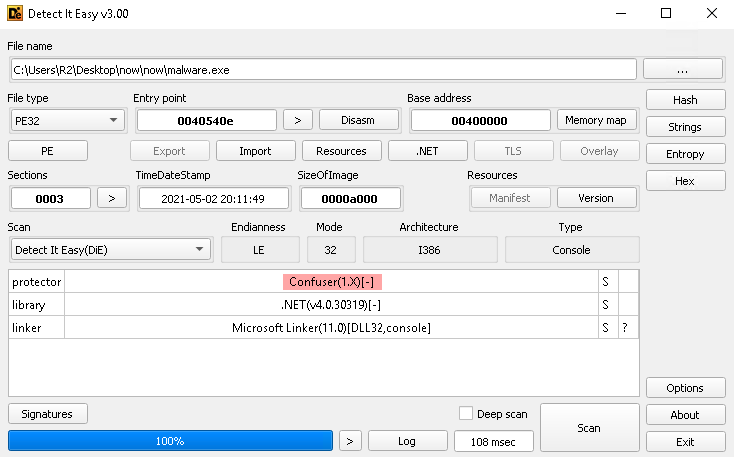
When we google “ConfuserEx”, we find the source code that probably obfuscated this binary. The repo is this: https://github.com/XenocodeRCE/neo-ConfuserEx
Linked Libraries and Functions
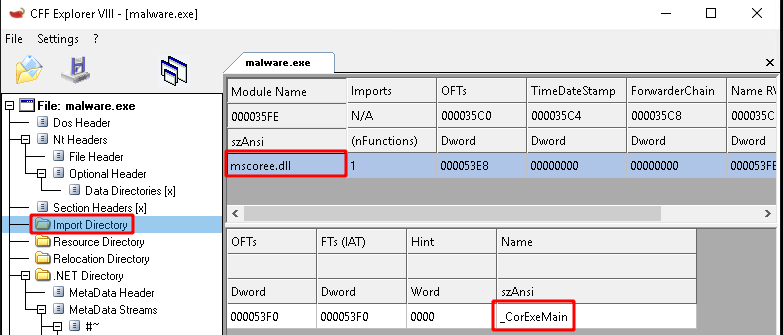
.NET PEs contain a single native import. In this case it’s CorExeMain, which is used to initialize the CLR and run the managed code.
Basic Dynamic Analysis
The basic dynamic analysis includes running the malware inside sandboxes and running it on a VM, and examining it using basic monitoring tools. First, let’s start with running it inside a sandbox.
I recommend using online malware analysis sandboxes like virustotal since they are easy to use and they share the data with everyone.
The result:
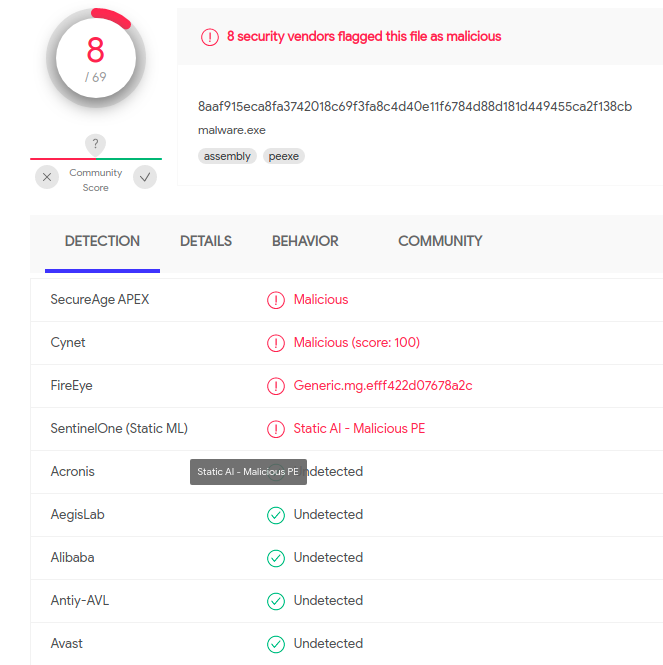
Virustotal collected a handful of information. It found the next modules being loaded in runtime.
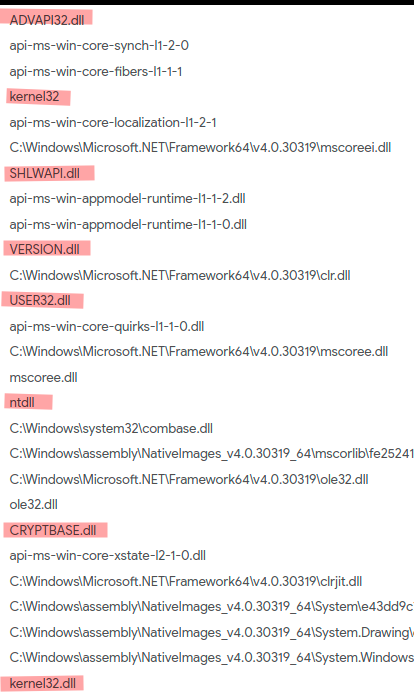
The majority of all of the above DLLs are usually used in malware samples, according to this Malware Data Mining paper; Baldangombo, 2013. The following table is taken from that paper.

Reading the description of each DLL gives an idea of what the malware is likely to do. The additional DLL that was loaded but not in the above table is CRYPTBASE.dll, which seems like it’s for some encryption functionalities.
Advanced Static Analysis
By now, we know that it’s a .NET file, which is good since we can disassemble it to one of the .NET languages. Disassembling a malware makes it relatively easy to analyze it since we can read the functions and debug them while reading a .NET language. To illustrate the differences between a “normal” executable versus a one written in .NET is that when we reverse engineer a normal executable, the disassembler will reveal a “normal” executable to x86/64 assembly, then we can use IDA to disassemble However, in .NET executables, the assembly instructions are in a different form. To read more about Assemblies in .NET, check out Microsoft’s documentation page: https://docs.microsoft.com/en-us/dotnet/standard/assembly/. Because the obfuscated malware is compiled to MSIL, we can disassemble it using one of the .NET disassemblers. To do that, I personally use https://github.com/dnSpy/dnSpy.
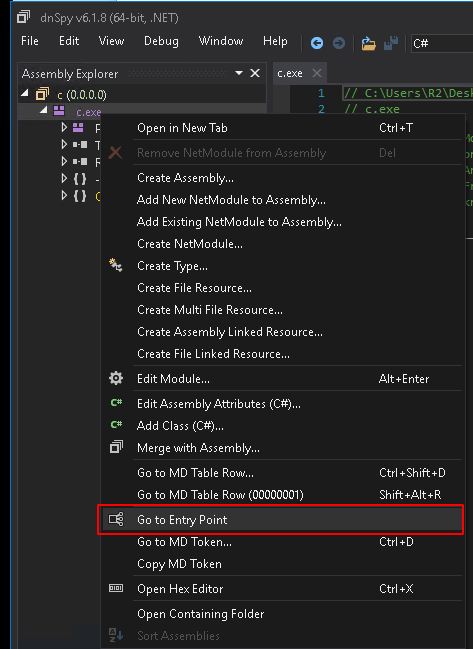
Before we open the malware using dnSpy, press CTRL + A, then DEL to delete all the entries in dnSpy, then open the malware. To go to the starting point where the malware starts executing, Click right on the malware entry, then click on “Go to Entry Point,” as shown in the following source code.
When we take a look at the main function, we quickly see the obfuscation function used. With a quick googling, we find that there are multiple methods to deobfuscate it.
However, if you carefully analyze the main function and follow the first execution of the Decrypt method, we can understand how it works. The next screenshot shows the execution flow.
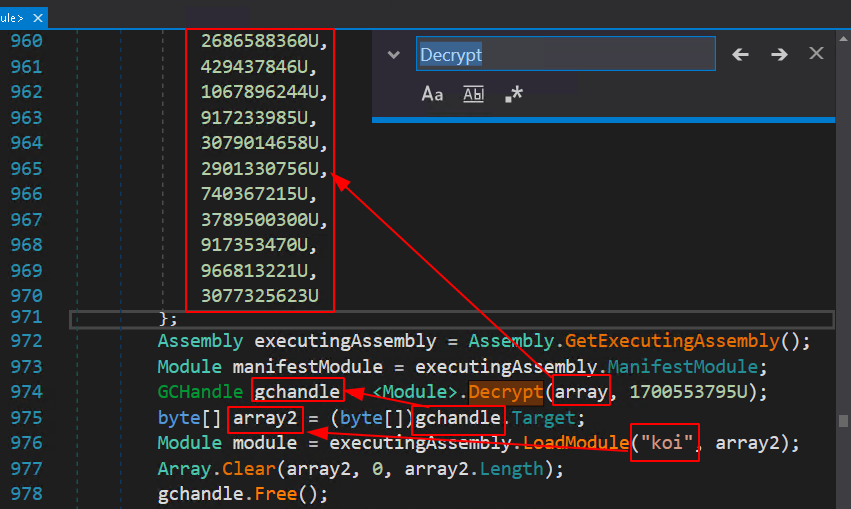
“Koi” is the string we found when we statically analyzed the file in the former steps. “Koi” is a name of a module that gets executed using the function LoadModule. As shown, the content of the module is taken from array2, which gets decrypted in the GChandle before it gets copied. That means at the end of line 907, the content of GChandle is the real content of the plan malware.
Advanced Dynamic Analysis
Since we have guessed how it works, we can now start debugging the executable. Using dnSpy, we set a breakpoint at line 978, where the statement tries to get GChandle and free it. Then, start debugging the code. The expected behavior is the following:
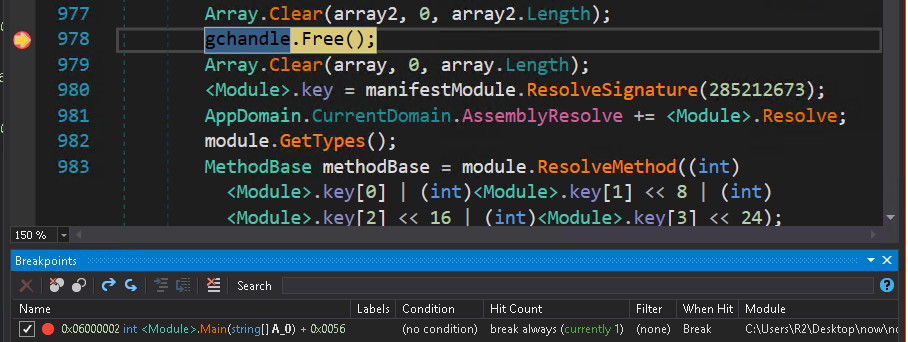
At this point, we know that the contents of GChandle have not been deleted. We can dump it by clicking on Debug -> Windows -> Modules. As a result, we will find “Koi” loaded on the bottom. To dump it, click right on it, then Save Module.
After dumping the “Koi”, open it again using dnSpy. You will clearly see a readable source code.
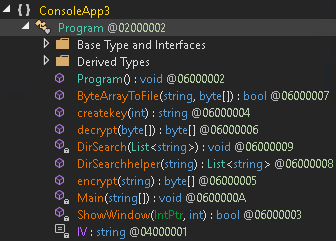
Now, we will go through each function and try to understand how it affects the system.
Starting from Main(), we will see that it sleeps for 10 minutes, which explains why it doesn’t do anything after it executes.

Before it sleeps, it uses the imported function ShowWindow() to hide the command line. This also explains why user32.dll was used.
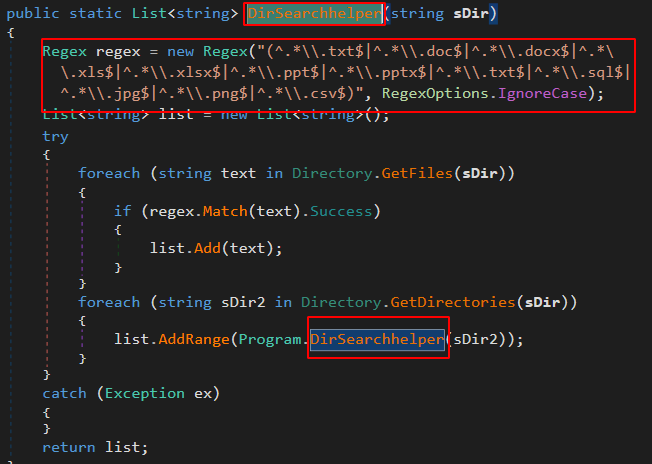
After that, it executes DirSearchhelper(), which recursively gets all the files that end with the specified regular expression.
The passed variable is the home path of whatever operating system is running the malware.

That means after DirSearchhelper() finishes, filesPaths will have a list of possibly important documents. After that, the malware checks if the file “killswitch.txt” exists. This is a self-descriptive file. It is supposed to be a kill switch.
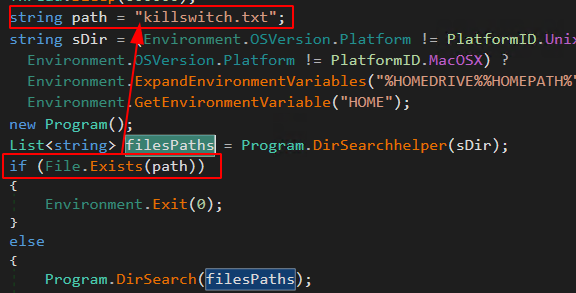
So if it doesn’t exist, it will execute the DirSearch() function.
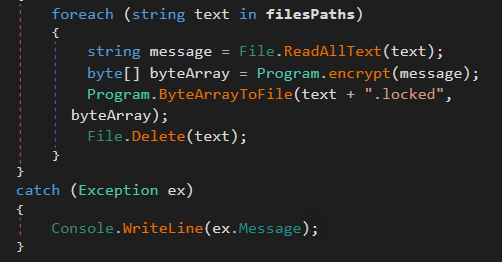
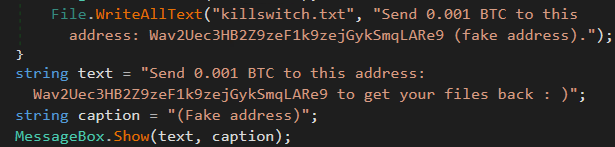
DirSearch() shows that it goes through each file and first opens it, then encrypts it, then saves it with the extension .locked, then finally deletes the original file. This malware appears to be ransomware that encrypts the files under the home dictionary then asks for Bitcoins, as shown below:
To sum up, this sample is an obfuscated ransomware written in one of .NET languages. The ransomware passed the sandbox analysis since it sleeps for 10 minutes before it actually starts encrypting the user’s documents. The ransomware encrypts the following extensions: .txt .doc .docx .xls .xlsx .ppt .pptx .sql .jpg .png .csv
Recovery
Let’s investigate the encryption method. The following is a chunk from the encryption method. It shows that it uses AES with CDC mode. It uses a static initialization vector with a standard Padding method.
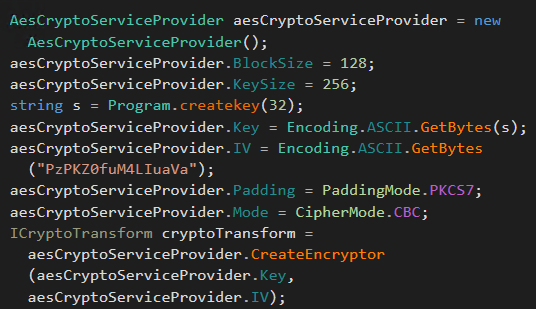
The only dynamic var in this encryption is the key, which is a random string of the below characters.
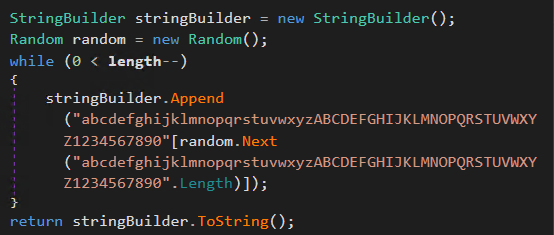
That means that recovering the key is certainly possible if the executable has not been exited yet. We can dump the key from memory and decrypt all the infected files.
To try recovering this, we can copy all the important encrypted files to a safe VM. After collecting the important file, we can write a script to read every file and decrypt it using the same cryptographic structure used in the encryption method.
The malware’s encryption method uses the CBC mode, PKCS7 padding, fixed initialization vector, and blocks with a size of 128. And more importantly, an unknown key that we need to extract from memory.
For the script, I used the python library pycrypto. According to pycrypto, AES has a fixed data block size of 16 bytes, so we need to change it and resize it in the script. For the padding, I used this class https://github.com/janglin/crypto-pkcs7-example/blob/master/pkcs7.py
The resulting instructions are the following:
aes_decrypter = AES.new(key, AES.MODE_CBC, IV)
aes_decrypter.block_size = 128
clear_text = PKCS7Encoder().decode(aes_decrypter.decrypt(encrypted_text))
print(clear_text)
Now we need to find the dynamic key, but when I tried to find the key using process explorer, it didn’t show any data in the memory.
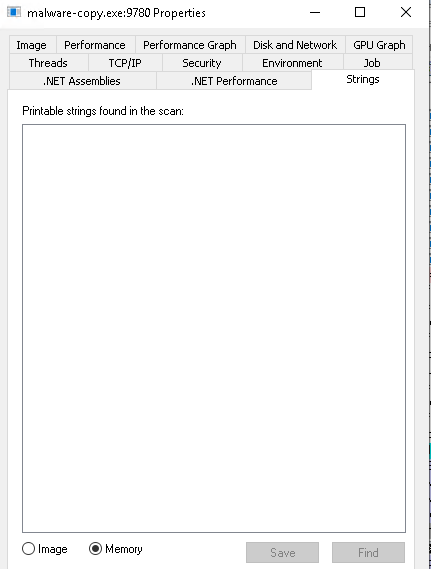
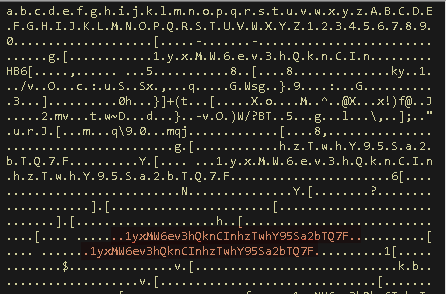
I am not sure why but another way to do this is by using wingdb. Attach the process to wingdb and then search for the following string:
s -u 0 L?80000000/2 “abcdefghijklmnopqrstuvwxyzABCDEFGHIJKLMNOPQRSTUVWXYZ1234567890”

Then search the areas near those locations you were given and you will find the key still resident in the memory.
Piecing everything together, we have the following script that can decrypt the same encryption method that is used in the ransomware:
from Crypto.Cipher import AES
import base64, StringIO, binascii, StringIO

class PKCS7Encoder(object):
    def __init__(self, k=16):
       self.k = k
    def decode(self, text):
        '''
        Remove the PKCS#7 padding from a text string
        '''
        nl = len(text)
        val = int(binascii.hexlify(text[-1]), 16)
        if val > self.k:
            raise ValueError('Input is not padded or padding is corrupt')
        l = nl - val
        return text[:l]

# Read
file_name = "README.txt.locked"
file_in = open(file_name, 'rb')
encrypted_text = file_in.read()
# Prepare
key = bytes("kqufuwAvmcTZxQTj8x6OFNmDgisUjoi1")
IV = "PzPKZ0fuM4LIuaVa"
# Create
aes_decrypter = AES.new(key, AES.MODE_CBC, IV)
aes_decrypter.block_size = 128
# Decrypt
clear_text = PKCS7Encoder().decode(aes_decrypter.decrypt(encrypted_text))
# Save
file_name = file_name.replace(".locked","")
file_in = open(file_name, 'w')
file_in.write(clear_text)
Using this script, you will be able to recover your files.
FIN
References
-
Baldangombo, Usukhbayar & Horng, Shi-Jinn. (2013). A Static Malware Detection System Using Data Mining Methods. International Journal of Artificial Intelligence & Applications. 4. 10.5121/ijaia.2013.4411.
-
Incident Response & Computer Forensics, Third Edition by Jason Luttgens, Matthew Pepe, and Kevin Mandia