Using Cobalt Strike with Tunnel-Manager for Distributed Hacking
TLDR: In this post, I will present a new solution for managing remote port forward tunnels. If you use Nginx or Socat to port forward your C2 traffic through multiple external servers, Tunnel-Manager will help you do that in a fast and efficient way. This solution helps manage remote tunnels and automates AWS node creation and deletion. Also, if your on-prem server is NATed, remote port forward tunnels can help you expose a port or more to the public and be able to receive external connections.
A well-designed C2 infrastructure makes the difference between a successful and unsuccessful Red Team operation. A way to have a well-designed robust hacking infrastructure is by using multiple instances for all threat communications. That makes it relatively harder to force you out. One instance can be easily blocked or black-holed by the blue team but when multiple ones are used, your attack infrastructure will not be impacted if one or two are burned.
Tunnel-Manager takes advantage of the fact that each new EC2 instance gets a new different public interface. It allows you to create a new node and establish a tunnel with one click. That means when one interface gets burned by the blue team, you can terminate the burned node and create another node that will get a different public interface. This way you don’t need to create a lot of nodes before the Red Team engagement, but you can create them along the way when needed in a fast way.
Tool Overview
The following is the landing page of the manager.
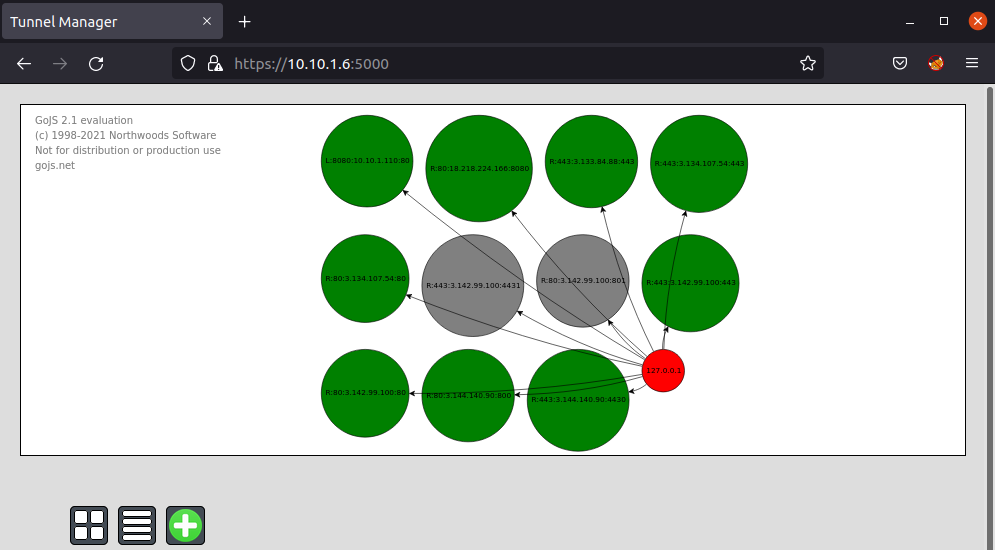
The graph on the center section of the page shows how many nodes your server is connected to. The plus icon is to add a new node.
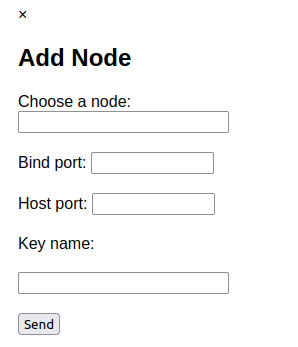
When you click on the add node icon, you will be prompted to enter a node IP, bind port, host port, and the key name that is going to be used to connect to the new node that you want to create. The key name must be the name of the private key you downloaded from your AWS dashboard. The node IP can be an IP that you already have in your configuration file or you can leave it empty to create a new node with a new IP.
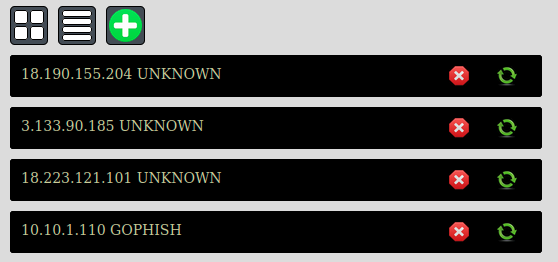
When you have connected nodes like in the above screenshot. You will find a refresh icon that reestablishes the tunnel connection and an X icon that just disconnects the tunnel connection.
Example
Let’s get down to business. Let’s say that I want to setup the following topology:
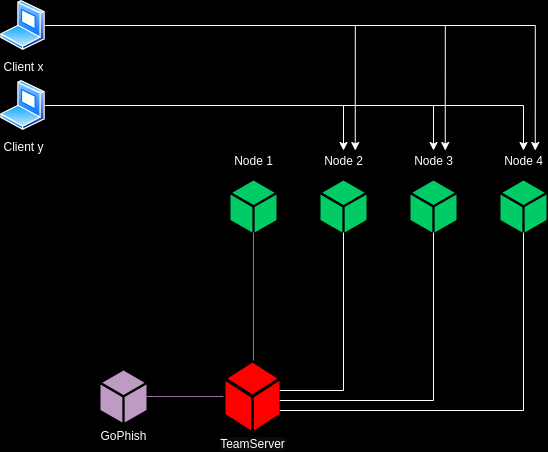
Let’s say that we have two running VMs on-prem, a GoPhish instance and a C2 team server instance. The teamserver is connected to 4 nodes. I want node #1 to redirect anything it gets at port 443 to the team server and I want the team server to redirect the traffic coming from node#1:443 to the local GoPhish instance. Also, let’s say that I want nodes #2,3, and 4 to redirect any traffic they get at ports 443 and 80 to TeamServer. That means that 443 and 80 ports should open in nodes #2, 3, and 4.
The above topology can be represented using the configuration file config.json.
{
    "autoreconnect": 0,
    "RemoteHosts": [
        {
            "IPAddress": "3.133.84.88",
            "BindPort": "443",
            "HostPort": "443",
            "Type": "Interactive",
            "Username": "root",
            "Key": "key-example.pem"
        },
        {
            "IPAddress": "3.134.107.54",
            "BindPort": "443",
            "HostPort": "443",
            "Type": "Interactive",
            "Username": "root",
            "Key": "key-example.pem"
        },
        {
            "IPAddress": "3.134.107.54",
            "BindPort": "80",
            "HostPort": "80",
            "Type": "Interactive",
            "Username": "root",
            "Key": "key-example.pem"
        },
        {
            "IPAddress": "3.144.140.90",
            "BindPort": "80",
            "HostPort": "800",
            "Type": "Beacon",
            "Username": "root",
            "Key": "key-example.pem"
        },
        {
            "IPAddress": "3.144.140.90",
            "BindPort": "443",
            "HostPort": "4430",
            "Type": "Beacon",
            "Username": "root",
            "Key": "key-example.pem"
        },
        {
            "IPAddress": "3.142.99.100",
            "BindPort": "443",
            "HostPort": "4431",
            "Type": "longHaul",
            "Username": "root",
            "Key": "key-example.pem"
        },
        {
            "IPAddress": "3.142.99.100",
            "BindPort": "80",
            "HostPort": "801",
            "Type": "longHaul",
            "Username": "root",
            "Key": "key-example.pem"
        },
        {
            "IPAddress": "18.218.224.166",
            "BindPort": "443",
            "HostPort": "8080",
            "Type": "Unknown",
            "Username": "root",
            "Key": "key-example.pem"
        }
    ],
    "LocalHosts": [
        {
            "IPAddress": "192.168.1.10",
            "BindPort": "8080",
            "HostPort": "443",
            "Type": "GoPhish",
            "Username": "root",
            "Key": "id_rsa"
        }
    ]
}
The objective of the JSON configuration file is to make the tunnels persistent after reboot.
The Description of Each Key
- Autoreconnect - Can be set to 1 to reconnect to closed tunnels in case of failure.
- RemoteHosts - Remote tunneling settings.
- LocalHosts - Local tunnelling settings.
- IPAddress - The public IP Address of your node.
- BindPort - The bind port, which is the port that will receive the traffic on the public-facing instance.
- HostPort - The host port, which is the port that will receive the traffic on the local host (team server). The traffic will enter through the bind port and get redirected to the host port.
- Type - The type of node. This is only a description. It doesn’t - impact the node in any way.
- Username - The username that is used to connect to the node.
- Key - The key that is used to connect to the node. The tool looks for the key inside the “keys” folder. You can change the path by changing the value of “SSH_KEYS” in variables.env.
An illustration of how the created nodes may be used on Cobalt Strike:

After configuring a payload to use one of the established listeners and then executing the payload, we can see that the device is connecting to 3.144.140.90 address which is one of the AWS instances created via Tunnel-Manager, as shown in the following screenshots.
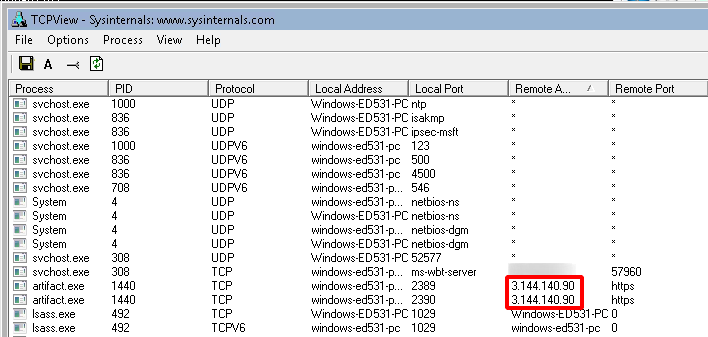
3.144.140.90 corresponds to the “Beacon” instance, as shown in the following screenshots.

The “Beacon” instance will receive the traffic on port 443 and redirect it to the local port teamserver:4430 as configured in the config.json file. That should allow a pipe of communication between the executed payload and the C2 software, as shown below.

Happy testing!
Date: Nov 24, 2021