Resource Efficient Internal Network Honeypots
An easy way to detect unauthorized access in networks is by deploying honeypots all over the network. In this post, I will go over a way to deploy internal resource-efficient honeypots. The objective of using these honeypots is not to collect data but to alert us of threats coming from inside the network via Slack channels.
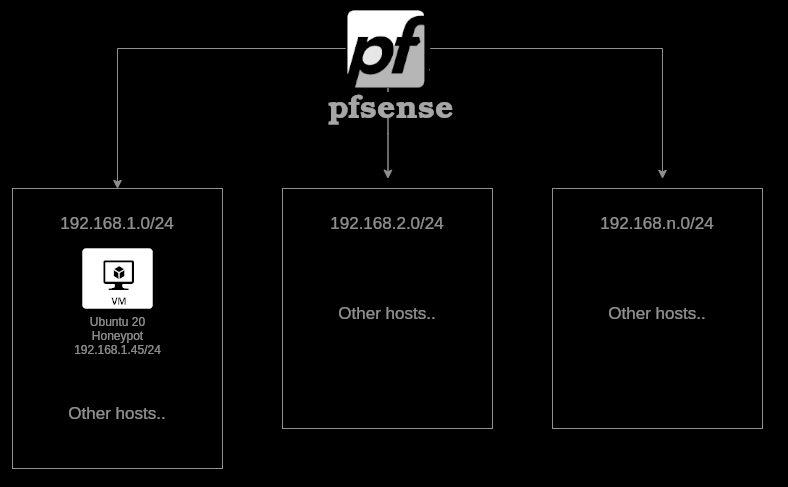
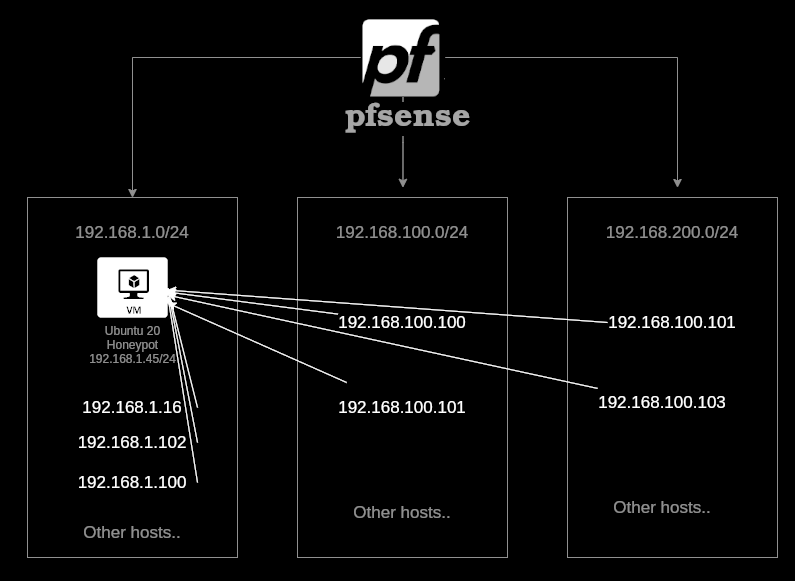
The idea is to create one VM or docker container with misconfigured services and create a pfSense Alias that has a large list of IPs that will redirect whoever connects to any IP from the list to the main honeypot. This way, we have a large number of traps in different networks using only one VM.
The next topology is an example of a pfsense router where it’s connected to n number of networks. In 129.168.1.0/24, the host 192.168.1.45 will be the honeypot we will use.
Instructions - Honeypot configuration
You can skip this section if you already have a honeypot in your network. The honeypot I used in the is post is a minimal Ubuntu server with a static IP set by pfsense DHCP. On Ubuntu, we want to add a number of users. In my case, I added this list of users:
useradd root
useradd Root
useradd administrator
useradd Administrator
useradd privileged
useradd Privileged
useradd superuser
useradd Superuser
useradd SuperUser
useradd megauser
useradd Megauser
useradd MegaUser
useradd hyperuser
useradd Hyperuser
useradd HyperUser
useradd manager
useradd Manager
useradd guest
useradd Guest
useradd rootuser
useradd Rootuser
useradd RootUser
useradd adminuser
useradd Adminuser
useradd AdminUser
useradd adm
useradd Adm
useradd user
useradd User
useradd info
useradd Info
useradd test
useradd Test
useradd mysql
useradd Mysql
useradd MySQL
useradd oracle
useradd Oracle
useradd ftp
useradd Ftp
useradd FTP
useradd pi
useradd Pi
useradd PI
useradd puppet
useradd Puppet
useradd ansible
useradd Ansible
useradd ec2-user
useradd vagrant
useradd Vagrant
useradd azure
useradd Azure
useradd azureuser
useradd Azureuser
useradd AzureUser
useradd adminusr
The usernames are taken from this common list: https://github.com/danielmiessler/SecLists/blob/master/Usernames/CommonAdminBase64.txt
Reconfigure OpenSSH
Allow root access by editing /etc/ssh/sshd_config
PermitRootLogin yes
Reconfigure PAM
What is PAM? PAM stands for Pluggable Authentication Modules. The main purpose of PAM is to handle the authentication mechanism for other applications like ssh.
To read more about PAM: https://www.redhat.com/sysadmin/pluggable-authentication-modules-pam
The idea is is to remove all the modules so the auth mechanism dosen’t work and starts accepting any password.
# Back it up
cp /etc/pam.d/common-auth /etc/pam.d/common-auth.bk
# : )
echo "auth	optional			pam_cap.so" > /etc/pam.d/common-auth
pfSense configuration
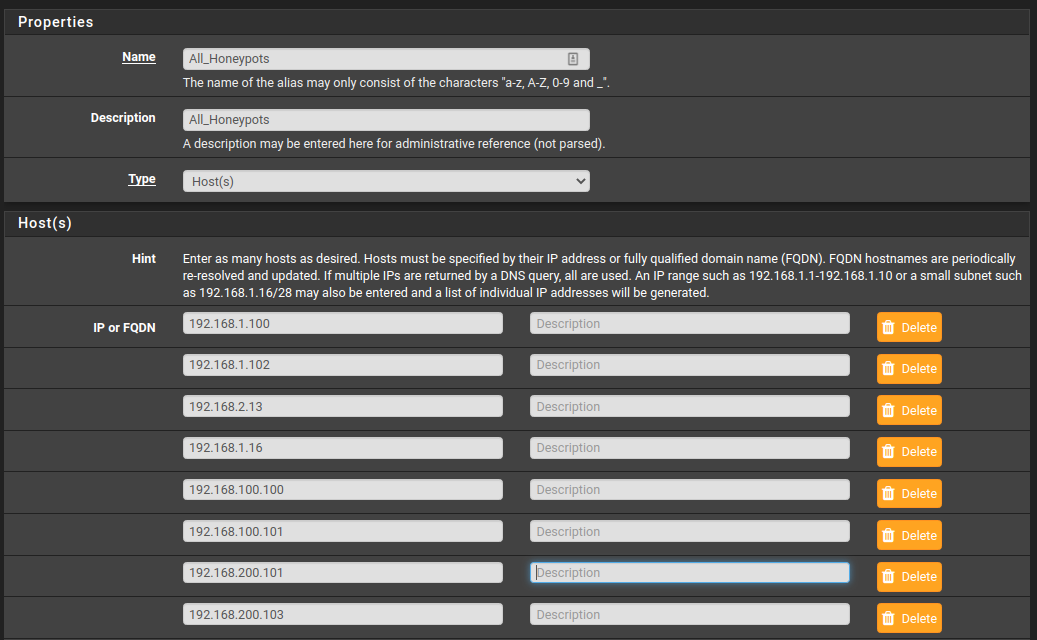
On pfsense, we need to create a new Alias that will have a list of IPs. Each IP from the list will represent a honeypot node. The idea is to have just one honeypot and a list of IPs that will redirect whoever connects to them to the main honeypot at 192.168.1.45.
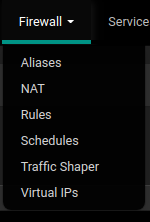
On pfSense, go to Firewall -> Aliases -> Add
Add a list of IPs that you don’t use and will never use.
Now ,we need to create a NAT rule. On pfSense, go to Firewall -> NAT -> Portforward -> Add.
Now, for each interface, you will do the next if the service is ssh; if not, change it accordingly:
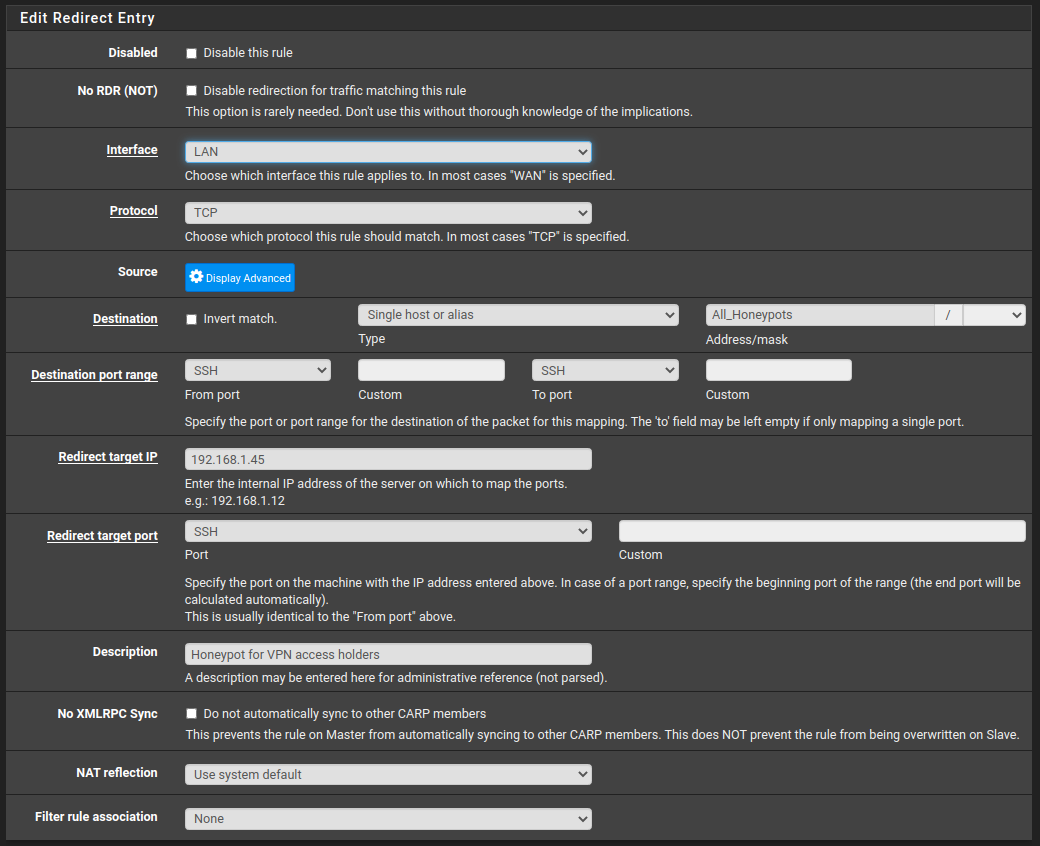
In the above screenshot, 192.168.1.45 is the IP of the honeypot we deployed previously. The destination must be the created alias from the last step. The interface in the above screenshot is set to LAN, but you need to do it for each interface you have so it gets applied in each subnet if you want to. Finally, the service in our case is SSH.
Important: With every new NAT rule, you create a new firewall rule that will be created in each interface at the end of the list, so you need to check each interface and make sure the order of your firewall rules is right.
An example of how your NAT rules might look like:
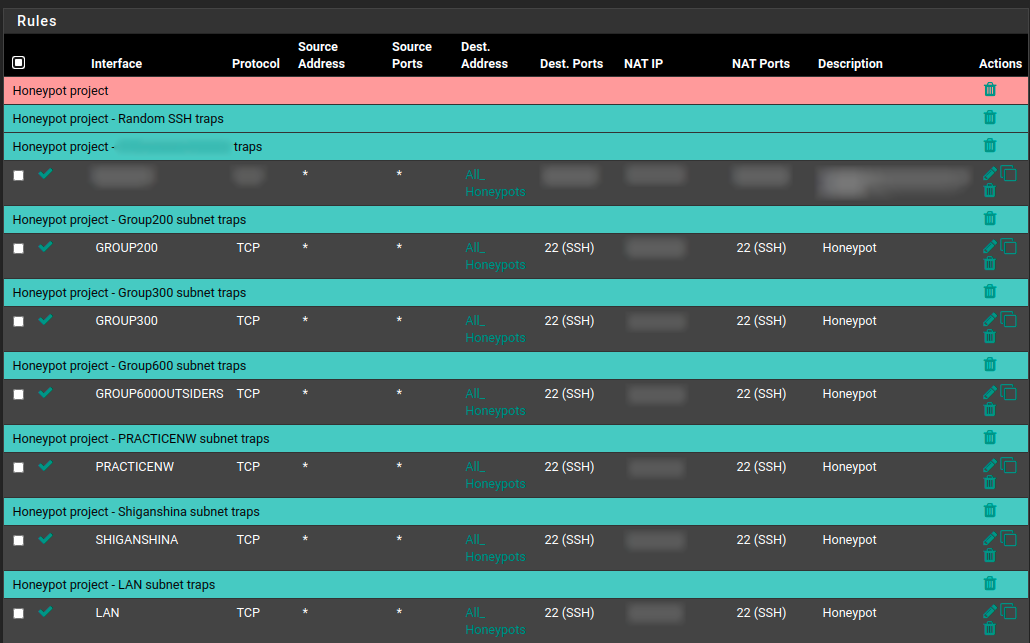
Save your new pfsense configuration.
Now, pfSense is portforwarding every new SSH connection on every red IP in the topology to 192.168.1.45:22.
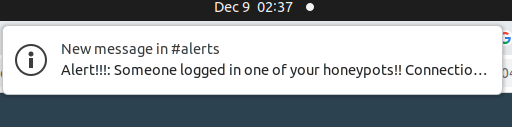
Notification
Now, let’s edit 192.168.1.45 profile file. Add the next lines to /etc/profile to get executed when someone logs in. Don’t forget to change your Slack webhook.
generate_post_data()
{
  cat <<EOF
{
  "text": "Alert!!!: Someone logged in to one of your honeypots!! Connection coming from: $SSH_CLIENT"
}
EOF
}

# Send an notification!!!
curl -X POST -H 'Content-type: application/json' --data "$(generate_post_data)" https://hooks.slack.com/webhook

# Shut it down now or exit
# shutdown now

# Exit if you want to kick the connecter out
exit

## End of the file
Now delete the history and log out, then take a snapshot of the disk and memory.
Test: Now, let’s connect to one of the aliases and see how it reacts.
[main@main:~]$ ssh [email protected]
Welcome to Ubuntu 18.04.5 LTS (GNU/Linux 4.15.0-126-generic x86_64)

 * Documentation:  https://help.ubuntu.com
 * Management:     https://landscape.canonical.com
 * Support:        https://ubuntu.com/advantage

  System information as of Wed Dec  9 02:04:40 EST 2020

  System load:  0.08               Processes:             153
  Usage of /:   19.0% of 14.74GB   Users logged in:       0
  Memory usage: 17%                IP address for ens160: 192.168.1.45
  Swap usage:   0%


0 packages can be updated.
0 updates are security updates.

Failed to connect to https://changelogs.ubuntu.com/meta-release-lts. Check your Internet connection or proxy settings


Last login: Wed Dec  9 00:10:37 2020 from 192.168.5.2
okConnection to 192.168.100.101 closed by remote host.
Connection to 192.168.100.101 closed.
[main@main:~]$
And boom, It connected to 192.168.1.45 and then sent an alert, and finally exited.

Important note
You need to completely restrict the honeypot’s access to the other hosts and networks it’s connected to. This is very important; otherwise, your honeypot will turn to a pivot point for attackers and will make everything worse than it is. I also recommend adding NIDS alert rules just to add another layer of visibility. This honeypot only needs to communicate with the gateway to send UDP DNS queries and 443 requests to Slack IP addresses. I recommend using an external DNS server and adding a rule for that. Finally, don’t rely on these IPs to detect unauthorized access. These kinds of honeypots ONLY detect amateur attackers. Experts can easily abuse your honeypot if not configured correctly.