Mine for Local Privilege Escalation Vulnerabilities in Windows Applications Using Automation and Virtualization
TLDR: A year ago, I noticed that there are very easy-to-spot vulnerabilities on Windows thick-clients that lead to local privilege escalation. I developed an automation solution that browses the web looking for Windows applications, downloads and installs them, and then performs some static scans on the system after installing the targeted software. When it finds vulnerable software, it sends notifications to Slack. Using this project, I was able to find more than 40 LPE vulnerabilities and 12 CVEs in a very short period. I called this project Miner: GitHub Repository. This post briefly talks about the project and shows how to start employing it.
Introduction
This automation project is designed to perform analysis in a massive number of executables. The tool receives a queue of executables, and then it spawns a number of VMs according to the number of executables. In each VM, it installs a targeted executable individually using different methods. Then it performs scans in the VM after installing the executable to find local privilege escalation vulnerabilities and indicators of poor design.
The tool is designed for large scans. For example, when a company like Logitech starts a bug bounty program, it’s hard to go over all their Windows Programs and drivers. An efficient way to find as many bugs as possible in a short period of time is to use an automation tool like the one introduced here to download all Logitech drivers and Windows applications, then perform scans on them after installation, and finally generate a report for each executable.
Basically, the solution I am offering downloads every executable it finds on given FTP servers or Github & GitLab repositories, then it performs its analysis and generates a report of the findings.
Design and Dynamics
Let’s look at the project’s environment and dynamics before getting into the details. The main host is a hypervisor running ESXi with vCenter; however other hypervisors could be used depending on preference. I also used two VMs, one to download binaries and the other one to start RDP sessions, and I will explain the idea of the RDP sessions later. I also used a Windows instance with WinRM enabled, where the tests will be performed. It’s not essential to have a Git server, but in my case, I deployed a Gitlab server to backup the generated reports. Finally, a Slack channel to receive alerts when a new vulnerability is found. The following diagram shows the relationships between all the mentioned servers.
Environment Diagram
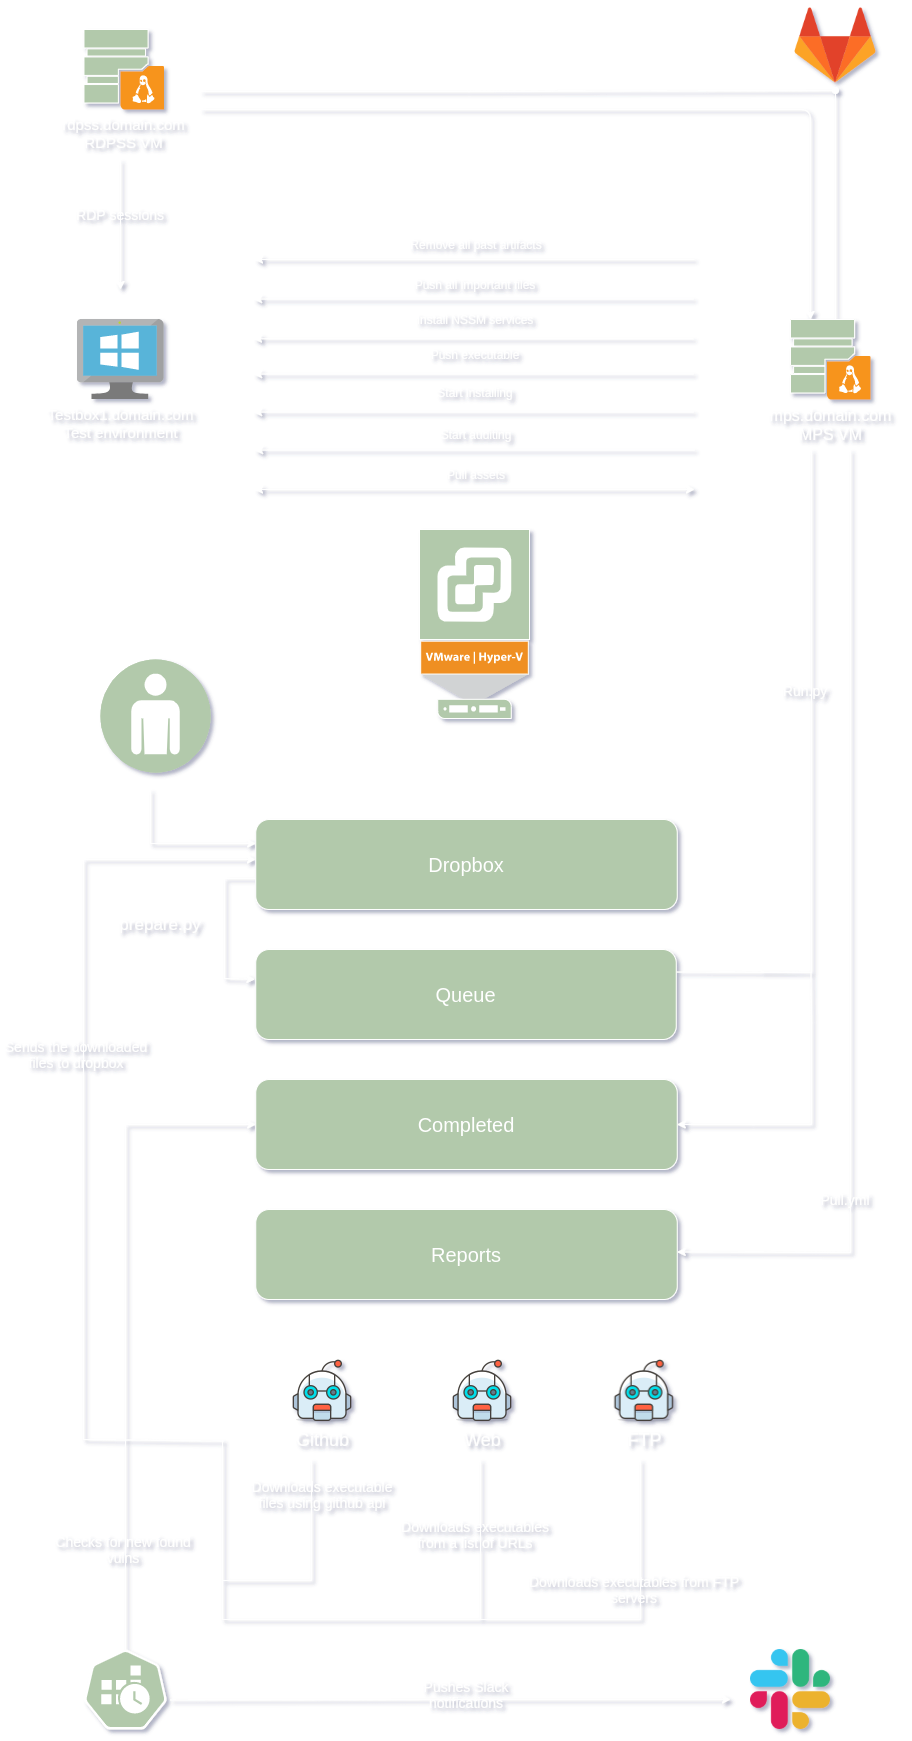
Refer to the diagram above when needed. The following section shows the environment used to run the project and the details of each VM.
MPS.domain.com:
It is the server that will browse the internet looking for Windows applications and store them. It does this using multiple processes to find applications, which will be explained later. While looking for Windows applications and storing them, MPS.domain.com will have the main script that runs everything else. This main script is called “run.py.” Run.py is the script that controls testbox1.domain.com using WinRM via Ansible. Run.py has three lists; dropbox, queue, and completed. Dropbox is where the “multiple processes” I mentioned above copy the files to and where I drop files that I want to analyze. The queue folder contains the binaries that are waiting to be analyzed. Compiled is where I store the name of executables that the Miner has analyzed. These are the main things that you need to know now. There are more shenanigans that I will explain later.
RDPSS.domain.com:
This server is a CentOS Linux release 7.9.2009 server that uses a Remmina configuration file to create RDP sessions in testbox1.domain.com when mps.domain.com requires.
testbox1.domain.com:
The virtual machine where the analysis happens. MPS.domain.com installs the executables in queue and then run scripts like PowerUp.ps1 in testbox1.domain.com to find vulnerabilities like:
- If you are an admin in a medium integrity process
- For any unquoted service path issues
- For any services with misconfigured ACLs
- Any improper permissions on service executables
- For any leftover unattend.xml files
- If the AlwaysInstallElevated registry key is set
- If any Autologon credentials are left in the registry
- For any encrypted web.config strings and application pool passwords
- For any %PATH% .DLL hijacking opportunities
In Miner, scripts like PowerUp.ps1 are the scripts that analyze the testboxN.domain.com VMs after installing the targeted binaries. You can customize your test in the form of PowerShell, Batch, or whatever scripting language you prefer and add them to run_startauditing.yml. Simple scripts can be beneficial. For example, show_all_tcp_listening_ports.ps1 lists all newly opened TCP ports. It might not seem like a big deal, but it tells us that the targeted binary has opened sockets, and it can be fuzzed or even manually tested. Other simple scripts can look for easy-to-spot vulnerabilities like credentials management, key management, and filesystem sensitive data exposure vulnerabilities.
Gitlab.domain.com:
A GitLab instance that should have mps.domain.com’s ssh public key to backup the analysis reports.
How Do They Work With Each Other
Mps.domain.com must have access to ESXi with vCenter to be able to revert testbox1.domain.com when needed. The vCenter user that Mps.domain.com uses must have the ability to only revert testbox1.domain.com. It also has to have inbound rules for port 80. Since there will be a web server running to send signals to RDPSS.domain.com, I used a webserver in MPS.domain.com because I don’t want to introduce new listeners on the system that might be vulnerable somehow or unstable. RDPSS.domain.com must be able to reach mps.domain.com at 80 and must be able to reach testbox1.domain.com at 3389. No inbound rules are needed.
Every Test VM (testbox1.domain.com) is just a clone of a template. Mps.domain.com knows the states of the cloned VM after installing the targeted binary. Based on the states of the cloned VM, Mps.domain.com initiates an RDP session from RDPSS.domain.com. Mps.domain.com then starts analyzing the changes in the cloned Windows system to find common Windows weaknesses using Ansible. It’s designed to accept different Ansible scripts that run other Python and PowerShell scripts inside the Windows VM (testbox1.domain.com). The above diagram shows the process.
How to Start Mining
First, I will start by explaining the flow. Everything starts from Run.py on MPS.domain.com. Run.py uses two modules; the first one is called main, and the second module is main_keys. Each module utilizes a method to install the targeted application. The Main module uses image recognition to find the “next” and other buttons to install Windows applications. Basically, the Main module uses the stored screenshots of some buttons and tries to find them and click them when possible. The other module is Main_keys, which tries a sequence of actions until it installs the software. Every time the function run(file_name, modules) runs, it uses a different module to minimize failure during the installation process. When adding a new module, the only thing needed is editing run(file_name, modules) and adding the new module in the modules list. The following code is an example of how Run.py should be.
    # static values that shouldn't be changed
    dropbox = "dropbox"
    queue = "queue"
    done_folder = "completed"

    # These are the Python scripts that will run to install the exe file.
    modules = ["main","main_keys"]
To start running the project, begin by copying the following instructions.
Fork the project from:
I do not recommend removing the lists that I already published. If you do so, you may retest the same binaries that I have already tested. After forking the project, clone your new fork in your MSP.domain.com.
Change the variables in the next files according to your environment. vars.yml should have the vCenter credentials and the name of the VM that will be cloned in each new analysis.
vcenter_hostname: 192.168.1.1
vcenter_username: [email protected]
vcenter_password: YeshDeshIsMypashhhhword
# vCenter Datacenter.
vcenter_datacenter: Datacenter
# vCenter Datastore, where you want to store new clones.
vcenter_datastores: [ datastore1 ]
validate_certs_flag: False
# The name of the VM you will be cloning in each new analysis.
VM_Name: Win10 RedTeam Testing
projectdir/Miner/Inventory.ini file:
[windowstesting]
10.10.1.1

[windows:children]
windowstesting

[windows:vars]
ansible_connection=winrm
ansible_winrm_server_cert_validation=ignore

[windowstesting:vars]
ansible_user=Administrator
ansible_password=testbox1password
ansible_become_password=testbox1password
projectdir/Miner/notifier/.env file needs only one change. Change VULNSCANNERS to your webhook channel.
VULNSCANNERS=https://hooks.slack.com/webhook
Apply these commands to install Mps.domain.com dependencies. I am assuming that you are using CentOS Linux release 7.9.2009 (Core) as Mps.domain.com:
yum update -y
yum install epel-release -y
yum install httpd git vim tmux python-pip wget -y
pip install ansible
pip install pyvmomi
pip install pywinrm
ansible-galaxy collection install community.vmware
yum groupinstall "Development Tools"
systemctl start httpd
systemctl enable httpd
MPS’s firewall settings so RDPSS.domain.com can access mps.domain.com, make sure you have the right range or IP:
# Firewall
firewall-cmd --permanent --zone=public --add-rich-rule='rule family="ipv4" source address="192.168.1.0/24" port protocol="tcp" port="80" accept'
firewall-cmd --reload
# Making sure that START_RDP_SESSION.env exists and has the right permissions.
touch /var/www/html/START_RDP_SESSION.env
chmod a+wr /var/www/html/START_RDP_SESSION.env
To manually debug MPS scripts, use the next commands:
# start by downloading files manually, exit when done
cd /projectdir/Miner/GithubScanner;python3 github-url-grapper.py
# copy and preparer the downloaded files
cd /projectdir/Miner;python preparer.py
# finally, run Miner
cd /projectdir/Miner;python run.py
To manually debug Ansible, use the next commands:
ansible-playbook site.yml -i inventory.ini --extra-vars "file_name=bin.exe run_version=main"
ansible-playbook site.yml -i inventory.ini --extra-vars "file_name=Vembu_BDR_Backup_Server_Setup_4_2_0_1_U1_GA.exe run_version=main_keys"
file_name should be the path of the file you want to analyze. run_version should be the name of module you want to use to install the file.
Setup a Windows template - testbox1.domain.com
Since we are using Ansible, you need WinRM to be running, and you need to create a new user without any admin privileges and add it to the WinRM group so Ansible can use it. Make sure that the Administrator and lowprivuser users are activated in the testbox1.domain.com server.
net user lowprivuser /add
net user lowprivuser Password-123*
net user Administrator "password123"
net user Administrator /active
net localgroup "Remote Management Users" /add lowprivuser
Then disable Windows script execution policy.
Set-ExecutionPolicy unrestricted
Enable WinRM and follow the instructions.
winrm quickconfig
Turn off Windows UAC, so it doesn’t break the image recognition scripts.
reg.exe ADD HKLM\SOFTWARE\Microsoft\Windows\CurrentVersion\Policies\System /v EnableLUA /t REG_DWORD /d 0 /f
shutdown /r /t 0
Start an admin powershell windows and then install Chocolatey and NSSM:
Set-ExecutionPolicy Bypass -Scope Process -Force; [System.Net.ServicePointManager]::SecurityProtocol = [System.Net.ServicePointManager]::SecurityProtocol -bor 3072; iex ((New-Object System.Net.WebClient).DownloadString('https://chocolatey.org/install.ps1'))
# start another powershell windows
choco install nssm
Finally, download PsExec from Link and copy it to this path /system32/.
Now, you can take a snapshot of the VM, but make sure you test the access of the low privilege user you created in the above steps.
Setup RDPSS.domain.com
Copy every file in /Miner/RDPSS/Linux/* from your fork to your RDPSS VM.
Install Remmina, sudo apt install remmina remmina-plugin-vnc -y. Then, make sure Remmina’s binary exists at /usr/bin/remmina. Then, execute rdpss.sh. The first time you use the script, it will ask you to enter the password of the test VM. Make sure you ask Remmina to remember the credentials or use the attached file windows.remmina after editing the username and passwords.
Finally, finish the RDPSS.domain.com setup by taking a snapshot. Make sure you take a snapshot while rdpss.sh is running. In case something goes wrong, you don’t need to interact with RDPSS. In unexpected failures, you just need to revert RDPSS.domain.com and nothing else.
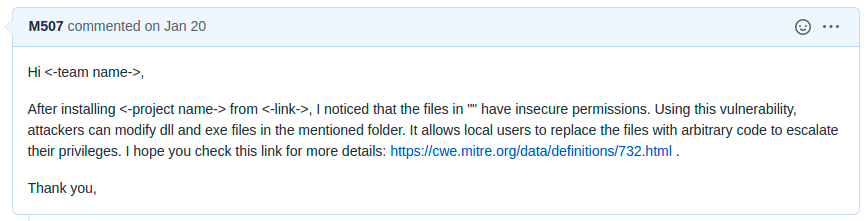
Reporting
The reporting process also can be automated. The creation of issues uses templates that look like the following screenshots. The following screenshot is an example of Insecure Permissions vulnerability:
The following screenshot is an example of Windows Unquoted Service Path vulnerability:
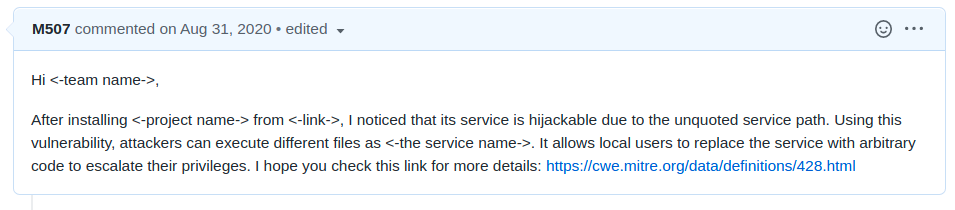
Whenever Miner finds a vulnerability, it uses the existing templates in notifier/ and generates a new issue; the rest is up to you to find the vendor online and email them or sometimes you can directly report the vulnerabilities on GitHub or GitLab.
Final thoughts
In my case, many of the vulnerabilities Miner found were in old software, and many of these vulnerabilities are unquoted service path and insecure folder permissions vulnerabilities. Still, one or two of these vulnerabilities found are in critical products like a product from Vembu, a backup and recovery solution for VMware, Hyper-V, and physical servers, which is used by a list of important clients (according to Vembu’s website) as shown below:

Miner found an excellent number of vulnerabilities. After testing 13099 binaries, Miner found 41 vulnerabilities in different binaries. Very few of them were already known, and the rest were new.I was able to issue only 12 CVEs, which can be found here.
For the rest of the vulnerabilities, I tried to contact the developers and vendors of the products, but some of them didn’t respond, and some just ignored the issues or replied like this:

So, after waiting for more than three months, I published several vulnerabilities on Exploit-DB since it’s easier than trying to get a CVE number for each vulnerability. The rest of the discovered vulnerabilities were not published on Exploit-DB since Exploit-DB doesn’t accept all vulnerability types. The following is a list of the discovered published vulnerabilities:
Program Access Controller v1.2.0.0
- https://www.exploit-db.com/exploits/48966
- https://exchange.xforce.ibmcloud.com/vulnerabilities/190825
IP Watcher v3.0.0.30
- https://www.exploit-db.com/exploits/48968
- https://exchange.xforce.ibmcloud.com/vulnerabilities/190824
WinAVR Version 20100110
- https://www.exploit-db.com/exploits/49379
- https://exchange.xforce.ibmcloud.com/vulnerabilities/194280
Ext2Fsd v0.68
- https://www.exploit-db.com/exploits/49706
- https://exchange.xforce.ibmcloud.com/vulnerabilities/198746
VFS for Git 1.0.21014.1
- https://www.exploit-db.com/exploits/49661
- https://exchange.xforce.ibmcloud.com/vulnerabilities/198405
Vembu BDR 4.2.0.1 U1
- https://www.exploit-db.com/exploits/49641
- https://exchange.xforce.ibmcloud.com/vulnerabilities/198151
FreeLAN 2.2
- https://www.exploit-db.com/exploits/49630
- https://exchange.xforce.ibmcloud.com/vulnerabilities/197919
bVPN 2.5.1
- https://www.exploit-db.com/exploits/49632
- https://exchange.xforce.ibmcloud.com/vulnerabilities/197938
DiskBoss v11.7.28
- https://www.exploit-db.com/exploits/49022
- https://exchange.xforce.ibmcloud.com/vulnerabilities/191386
Rumble Mail Server 0.51.3135
- https://www.exploit-db.com/exploits/49203
- https://exchange.xforce.ibmcloud.com/vulnerabilities/192729
System Explorer 7.0.0
- https://www.exploit-db.com/exploits/49248
- https://exchange.xforce.ibmcloud.com/vulnerabilities/193324
Privacy Drive v3.17.0
- https://www.exploit-db.com/exploits/49023
- https://exchange.xforce.ibmcloud.com/vulnerabilities/191387
Sandboxie Plus v0.7.2
- https://www.exploit-db.com/exploits/49631
- https://exchange.xforce.ibmcloud.com/vulnerabilities/197937
AnyTXT Searcher 1.2.394
- https://www.exploit-db.com/exploits/49549
- https://exchange.xforce.ibmcloud.com/vulnerabilities/196532
The findings were “mined” in approximately 15 days. Even though a significant part of the process is automated and there is no interaction needed during the analysis phase, reporting, keeping track of the issues and emails, and explaining the problems to the developers are time-consuming tasks. Also, reporting vulnerabilities for free is not very motivating, but in general, I recommend running it for a bit if you have the time and the hardware resources. I am sure the internet is full of applications that have easy-to-spot vulnerabilities.
Contribution
If you want to contribute, I have a couple of ideas you might like:
- You can integrate fuzzing tools: for example, detect newly opened ports and start fuzzing them using generic boofuzz templates.
- You can add Linux binary support!
- You can improve the image recognition accuracy of the Windows installation scripts
main.pyormain_keys.pyor add new modules that can read installation wizards to cover edge cases. - You can research the idea of replacing virtual machines with windows containers.
Legal statement
Everything in this post and Miner’s repository focuses on automated static analysis. No dynamic testing was performed.
Date: July 25, 2021