DHCP Infrastructure Security: Practical Implementation of DHCP Starvation & DHCP Spoofing
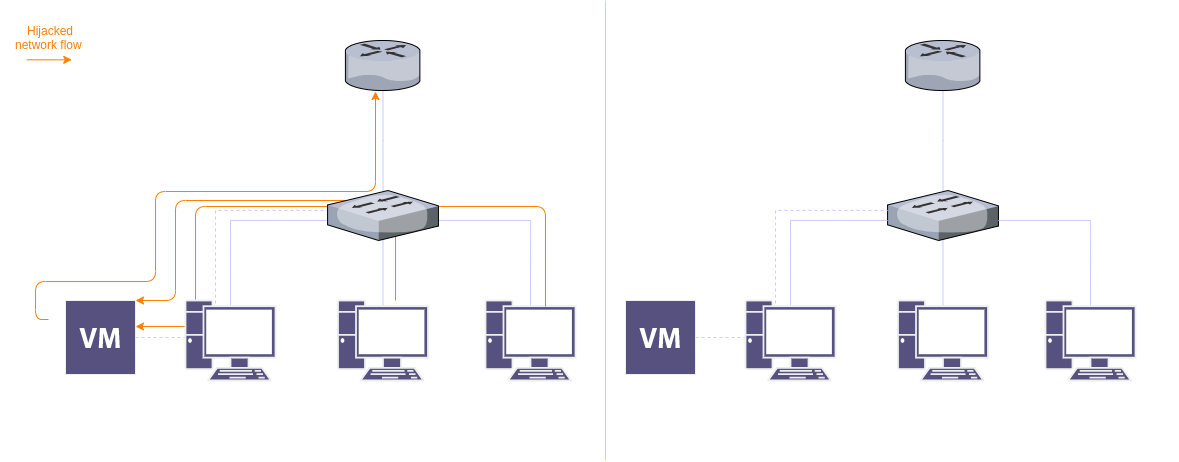
Table of Contents Table of Contents
- Introduction
- Topology
- Attacks
- DHCP Starvation Attack
- DHCP Spoofing Attack
- Mitigations using DHCP Snooping
Introduction
DHCP stands for Dynamic Host Configuration Protocol), which is a standard service in almost all networks. This protocol provides essential information to every new device in a network. It supplies information like the new device’s IP in the network, the network’s DNS server, and the network’s gateway.
The service starts with a process termed DORA, which is short for Discover, Offer, Request, Acknowledge. The process begins with the server binding on port 67 for detecting packets on the network sent by new devices in the network. When a client throws out a Discover packet across the network, the server running the DHCP service recognizes it and answers with an offer communicating an offered IP address over to the new device. The new device/client later asks for that IP address from the DHCP server, and the DHCP server verifies that request by ACK packet back to the device.
Topology
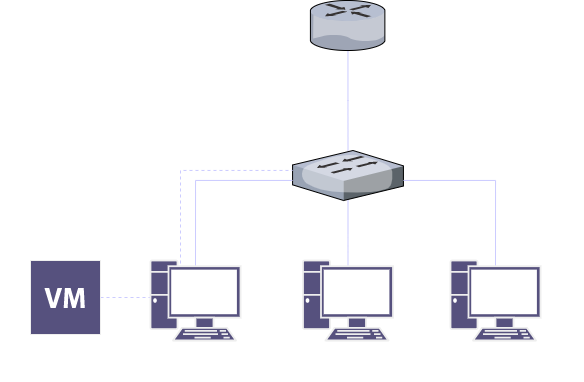
The topology shows a router, a switch, three PCs, and a VM in one of the PCs.
The Attack
As I mentioned above, a DHCP server communicates with clients by using the well-known DORA process, where the server listening is a ligament server. In this attack, the DHCP server is the attacker, and it supplies false information to the devices. Thus, attackers can set fake Gateway IP addresses and fake DNS servers.
DHCP Starvation Attack Replication
In the replication, we will be using Yersinia and Dsniff on Kali Linux.
- Configure the router
- Assign an IP address to interface 0
- Enable the interface
Commands used:
config
int f0/0
ip address 10.10.10.254 255.255.255.0
no shut
end
Now we need to enable DHCP, to do that follow the next steps:
- Create a new pool
- Assign a network to the created pool
- Assign a gateway to the created pool
- Assign a DNS server to the created pool
- Assign a domain name to the created pool
- Set a lease time to the created pool
- Add excluded-address
Commands used:
# DHCP
config
service dhcp
ip dhcp pool MAIN-POOL
network 10.10.10.0 255.255.255.0
default-router 10.10.10.254
dns-server 1.1.1.1 8.8.8.8
domain-name 1337team.com
lease 9 0 0
exit
ip dhcp excluded-address 10.10.10.254
ip dhcp excluded-address 10.10.10.1
end

# Debug dhcp
show ip dhcp binding
The result after configuring DHCP and connecting all devices including the attacker’s device should be similar to the next screenshot:
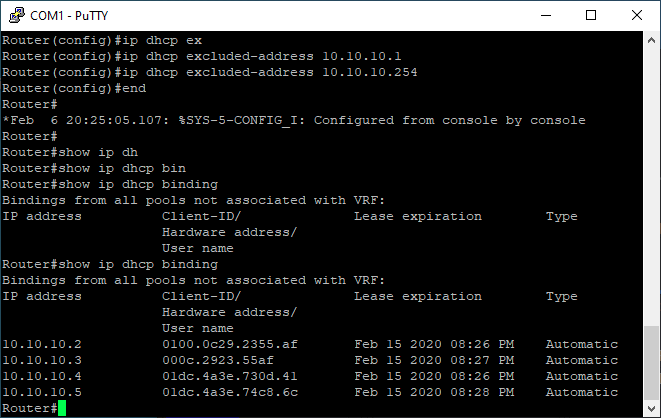 Screenshot description: Normal output from the router before the attack
The DHCP Starvation Attack steps:
- Install Yersinia and Dsniff
- Start Yersinia and start sending a DHCP DISCOVER packets
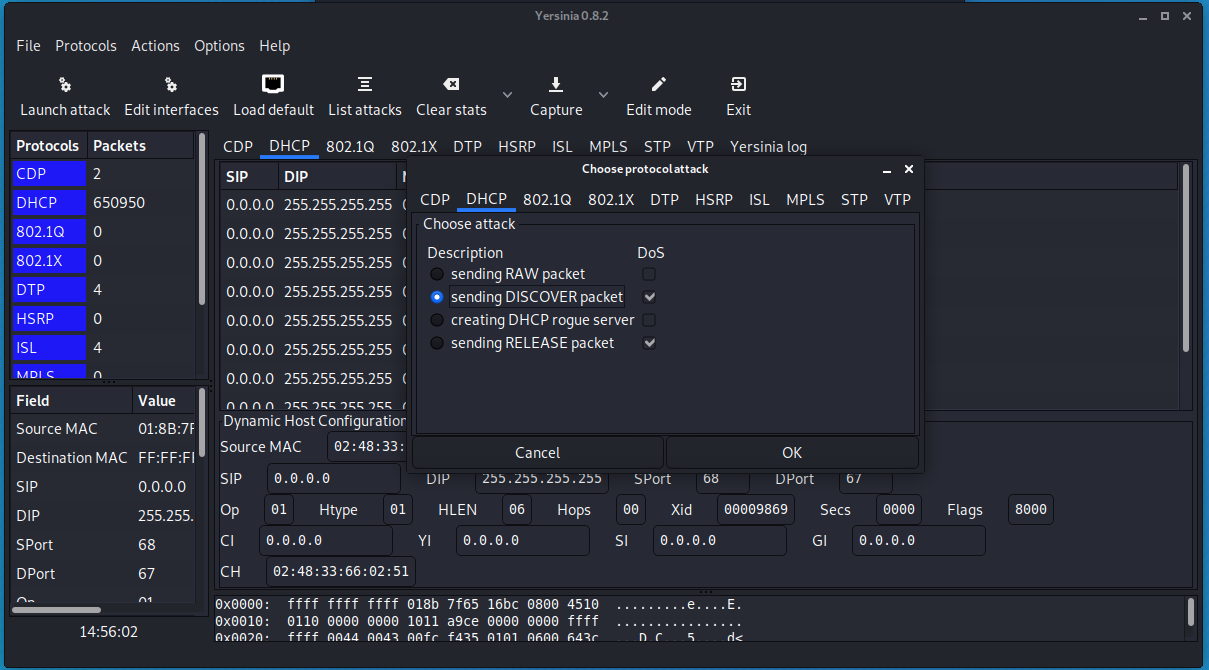 Screenshot description: Yersinia interface when launching the attack.
Wireshark outputs when performing the attack. The attack’s device is sending uncountable number of DISCOVER packets.
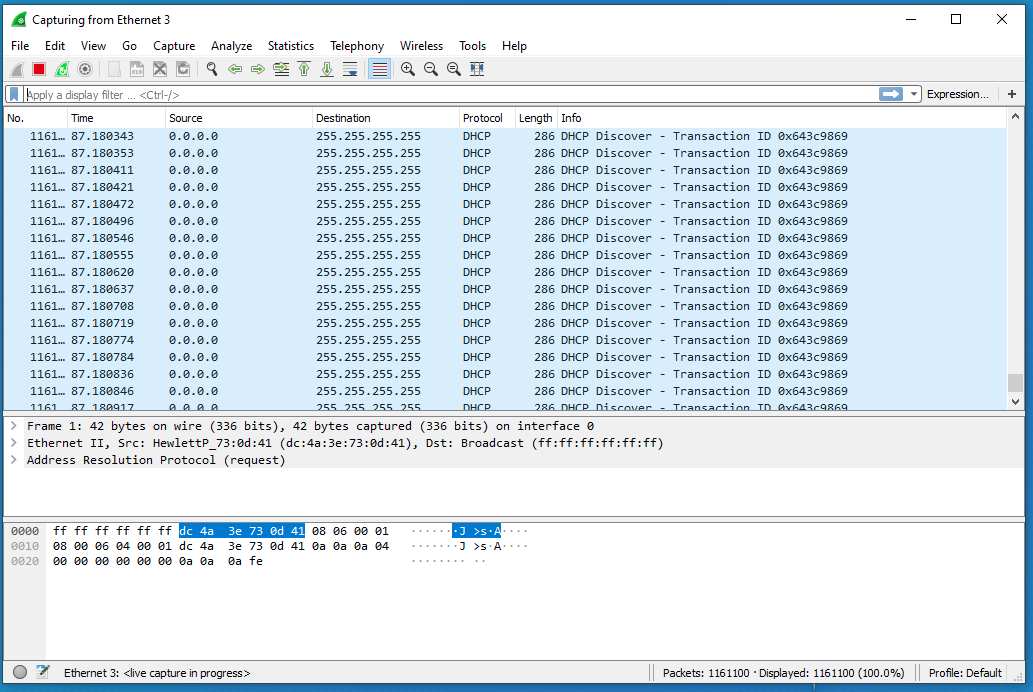 Screenshot description: Wireshark sniffing results
Meanwhile the router’s database is packed with fake leases.
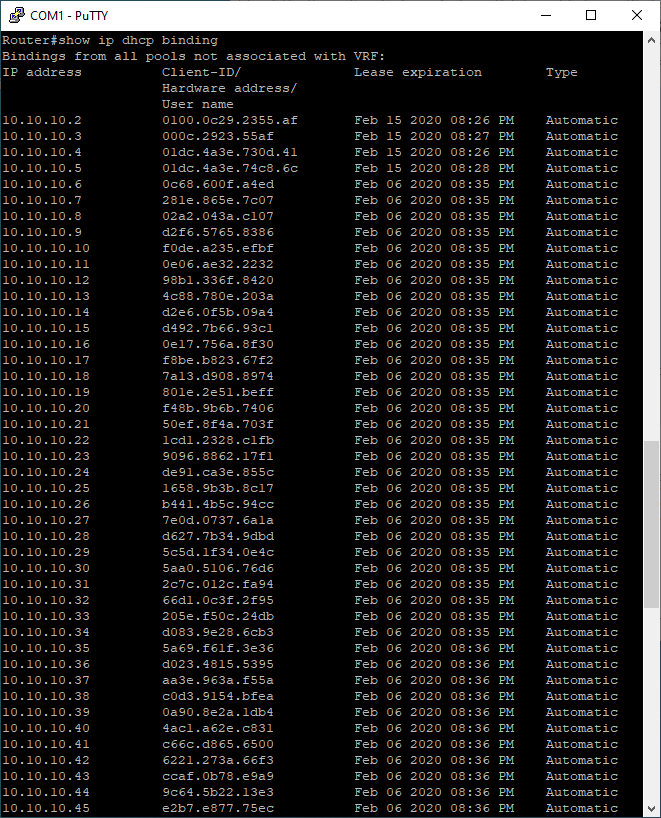 Screenshot description: Packed database from the switch CLI
Which is an indicator of a successful PoC.
DHCP Spoofing Attack Replication
This is another type of attack that can be used. It occurs when an attacker attempts to respond to DHCP requests and to try to set themselves as the default gateway or DNS server, then intercept all traffic. The attackers basically run an illegitimate DHCP server and configure it as they want.
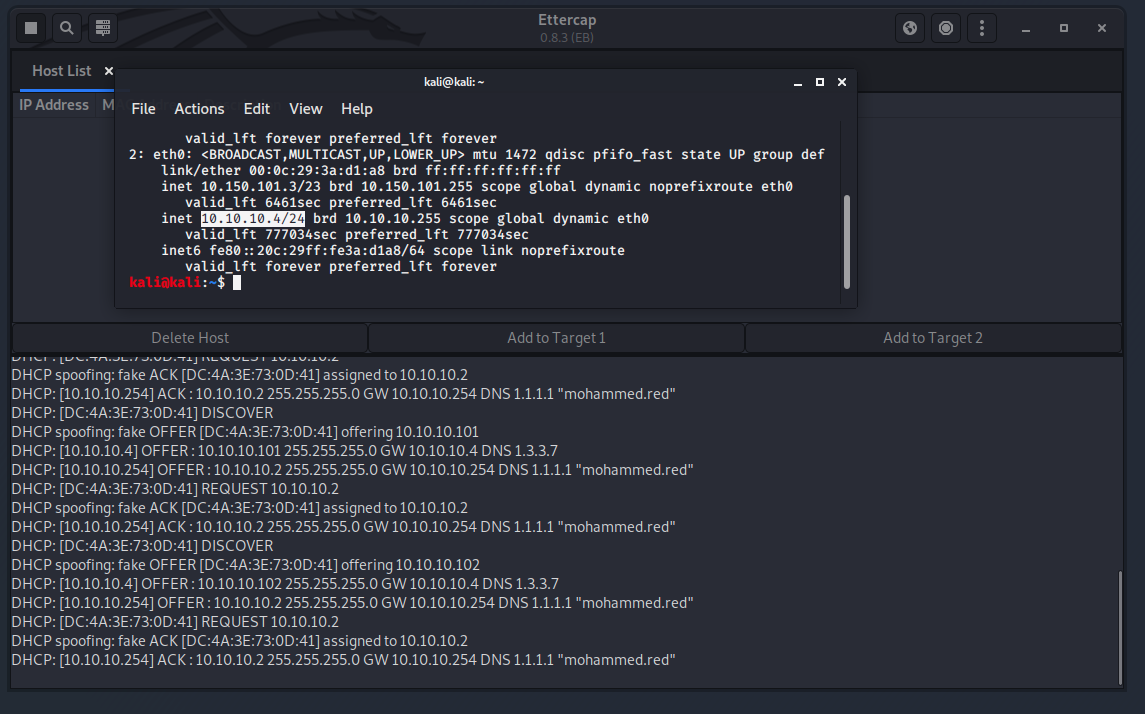
To setup the rogue DHCP Start Ettercap and start a DHCP spoofing attack as shown.
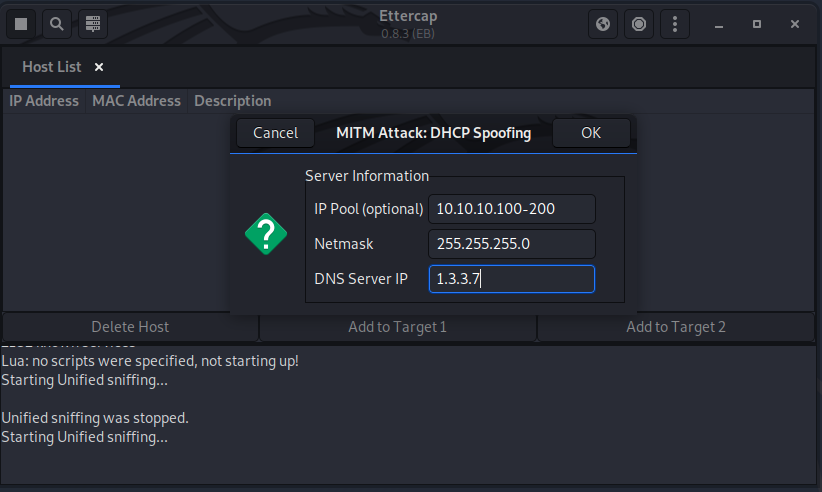 Screenshot description: Starting an attack via Ettercap
On the victim’s side:
- Start capturing the network traffic
- Release the DHCP lease then renew it.
- Observe the how Ettercap sends the fack date to the victim’s device.
This next screenshot is an example of a response coming from the fake DHCP server.
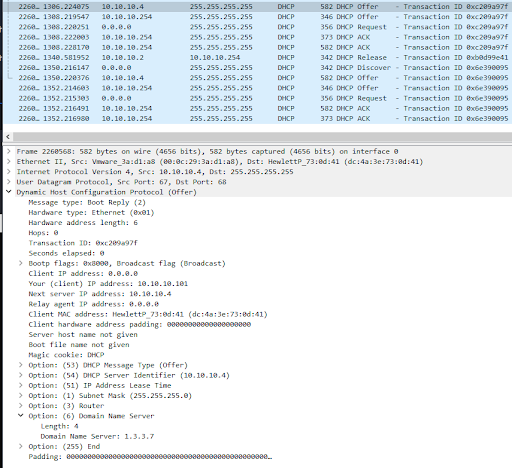
How it should look like from the the attacker’s side
The next screenshot will show the new IP of the victim’s device.
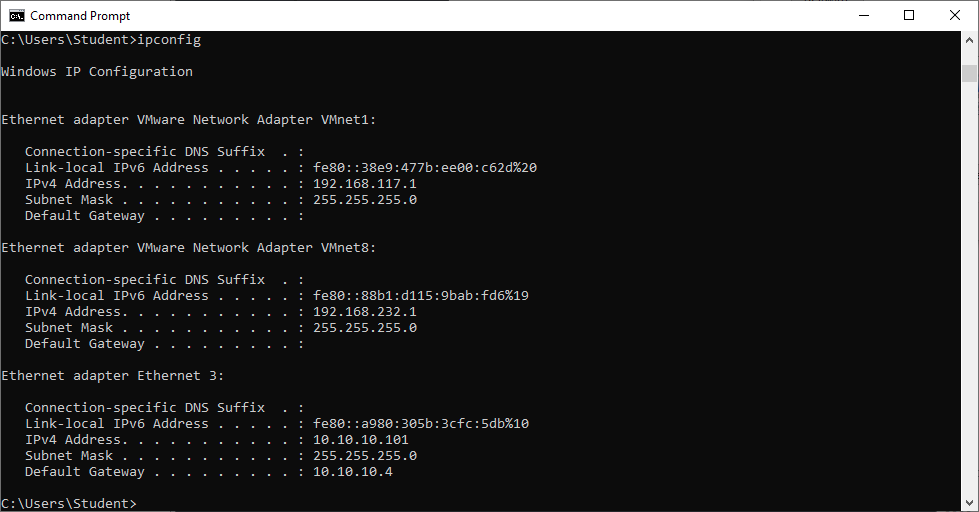
And of course even the DNS has chnaged in the victim’s device as shwon below.

Mitigations
These types of attacks are not new, and there are solutions not to fall victim to them. CISCO has a security feature to prevent these attacks. The security feature is called DHCP Snooping, which can validate messages from untrusted hosts and drop them. Additionally, it can evaluate DHCP traffic from the trusted and untrusted hosts.
To enable the security features follow the next steps.
On the switch configuration command line do the next:
- Enable DHCP snooping
- DHCP snooping for vlan 1
- Configure DHCP snooping for interfaces.
- Configure DHCP snooping limit rate and mode.
The commands used to configure the switch:
config
ip dhcp snooping
ip dhcp snooping vlan 1
interface range f0/0-<whatever you want>
ip dhcp snooping limit rate 3
ip dhcp snooping trust
end
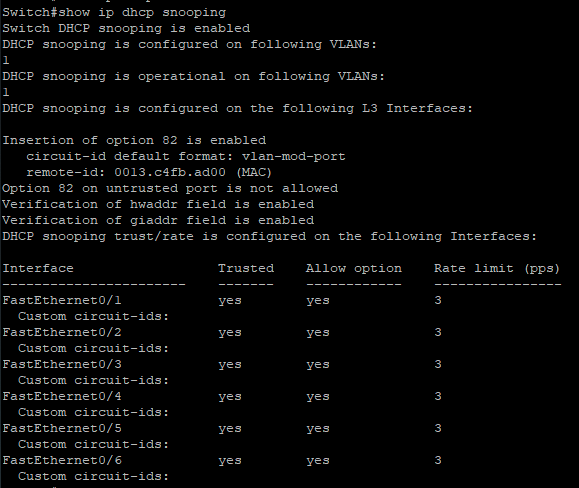
# Debug
show ip dhcp snooping
After configuring the switch, this is the result:
Now, repeat the attack and observe the switch CLI. You will find that the switch will always find out about the rogue DHCP server and block the port sending the fake packets.
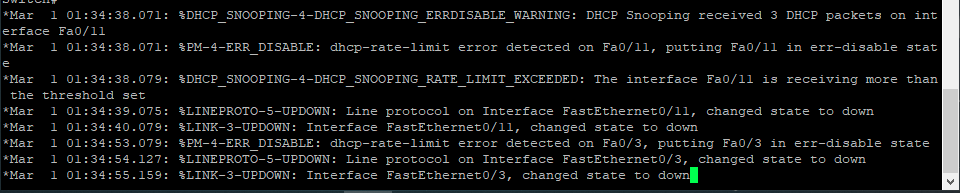 Screenshot description: Results of the applied mitigations.
That’s all, stay safe : )