Applied Purple Teaming Series ( Weaponize Windows ) Part 2
In this part, we will work with Kolide Fleet agent, OSquery, and Wazuh. We will go through the process of installing and configuring Kolide Fleet agent, OSquery, Wazuh, and rsyslog on Windows instances and Ubuntu. We will structure the right firewall rules on each instance, pfSense, and Security Onion Solutions. We will also go over the process of creating Wazuh, creating agent entries, and extracting their keys so it can be used by Windows and Linux instances to import the server’s data. Then, we will configure the Wazuh agent on Linux distributions manually. We will also go over the procedures of connecting on the Fleet server with each instance manually and using the Fleet launcher. After finishing configuring each instance, we will have an overview of what we have done from a network perspective.
Moving on, we will start weaponizing our Windows instance and Linux. For Windows instances, we will install Flare-VM scripts, which will give us convenient tools that can help us with our malware analysis and incident response practices. After that, we will download Windows Sysinternals Suite, and I will briefly describe how Procmon, Process Explorer, TCPView, and Autoruns can be useful. Since Sysinternals tools don’t cover everything we need, we will also go over some of NirSoft utilities; utilities as DriverView and FolderChangesView FolderTimeUpdate, RegistryChangesView, and ServiWin, and at the end, I will briefly describe how each one can be useful. For Linux instances, SIFT VM should have many handy Linux tools. We will not need to download any external tools for our Linux distribution since SIFT workstation should be enough for most of our practice.
We will start by installing OSquery, Wazuh on Windows. First, we need to download Wazuh and Fleet with OSquery agents. We can download them from the vendor’s website but I recommend downloading them from SOS’s download page. SOS offers partially configured agents, which will save time configuring them. Elasticsearch forwarder is not pre-configured so it doesn’t matter where you download it from.
Wazuh on Windows
Before installing Wazuh, we need to create a client entry using the Wazuh manager. That can be done by executing so-wazuh-agent-manage and adding an agent and then extracting the generated key so we can use it on the agent to import the agent’s configurations from the server.
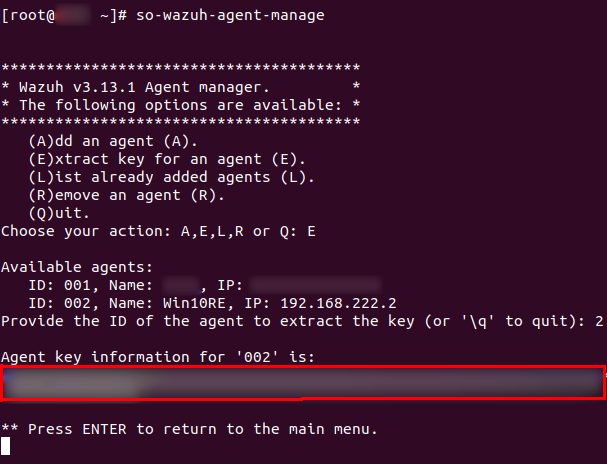
Now, install Wazuh agent on Windows, and start Wazuh’s GUI then enter the manager server which should be the SOS server and the agent’s key to pull the agent’s data.

Kolide Fleet launcher on Windows
Fleet’s agent is already pre-configured with the server certificate and OSquery enrollment secret. So after you install Wazuh, install Fleet’s agent which will install osquery too. For debugging purposes, this agent will not create a service called osquery, the service will be called:

Now, restart the workstations/server.
SOS Firewall inbound rules for Windows
I have briefly gone through this part for Windows in part one but I will go over it again to explain it in detail. After adding the agents on the Windows VMs, we need to add firewall rules to allow receiving data from the configured VMs. For Windows, we used OSquery, Wazuh, and Logstash forwarder (Winlogbeat), thus, we need to add rules to accompany them. SOS comes with a script that deals with that for us. We only need to execute it and follow the instructions. The script is “so-allow”. For Windows, we will execute the script and add three rules as shown below with a range of a single IP. The best practice here is to add a single IP Address.
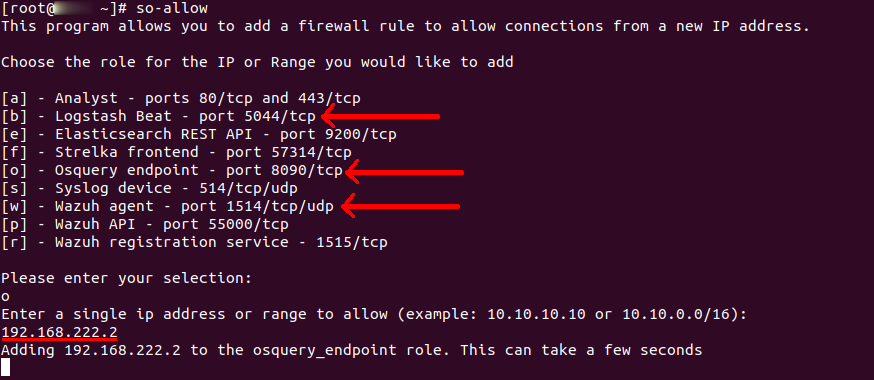
We don’t need to add firewall rules for the VMs since they use outbound connections which are by default allowed on Windows. However, if you also want to strict your Windows Server outbound rules, you need to allow 5044 TCP, 8090 TCP, and 1514 TCP and UDP. It’s very important to tune and strict outbound rules in all internal servers. However, I don’t recommend doing that in this series because we want to run malware in the VMs and want to analyze them. Stricting Windows outbound rules might not allow some of the malware we will run since some malware don’t use common ports like 443, 80, 53.
Verify, we can verify that it’s working well by checking the traffic on Windows, logs on Kibana, or from the alerts’ page on SOS.
SOS https://sos.mydomain.com/alerts page shows my successful RDP logins coming from windows_eventlog:

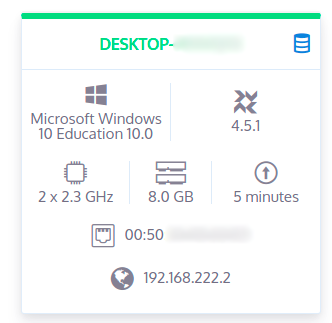
On fleet https://sos.mydomain.com/fleet/:
At this point, we finished configuring Windows VMs. We can take a snapshot of all Windows VMs.
Linux - SIFT Virtual Machine
For Linux VMs, I recommend downloading SIFT Virtual Machine from https://digital-forensics.sans.org/community/downloads.
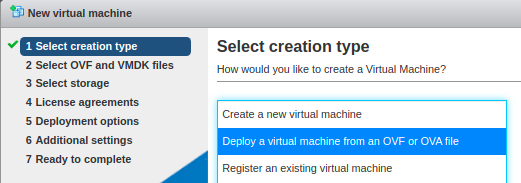
SIFT VM comes with useful tools. Importing SIFT’s OVA file is very easy to do. You only need to upload the OVA instead of creating a VM:
Now, we need to install the monitoring agents on this Linux VM. SIFT is an Ubuntu VM so we will use a different approach to send the system logs to SOS. Rsyslog is going to replace logstash forwarder, but the rest will be the same. Fleet’s agent and Wazuh will be used on Ubuntu.
SIFT Firewall
Make sure that your Ubuntu instance doesn’t have any outbound rules that might block the agent’s services. Double-check that by listing your iptables rules:
sudo iptables -L
Download the partially configured Wazuh and Fleet agents from SOS’s download page.
There should be two files; deb-launcher.deb and rpm-launcher.rpm.
Kolide Fleet launcher on Linux
Starting with Fleet, it’s very straightforward to install. You only need to check that you have the right flags with the right contents for each file. The file to inspect:

An example of the content:
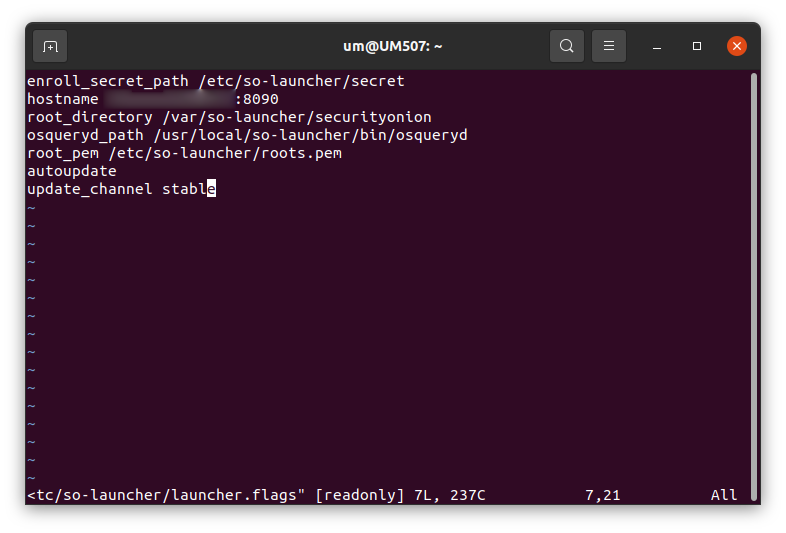
Make sure that the certificate is correct. In the past, I needed to copy them manually due to a usual behavior so I would recommend validating that you have the right certificate and key. In large environments, you will not do them manually. You most likely will be using an automation tool like Ansible. At the end of this post, I will provide a link for an Ansible playbook I wrote that you could use to configure any Windows and Debian/Ubuntu Linux server easily with almost no overhead. However, for now, we need to know how we can configure them manually so we understand how our network looks and so we can debug it when needed.
Wazuh on Linux
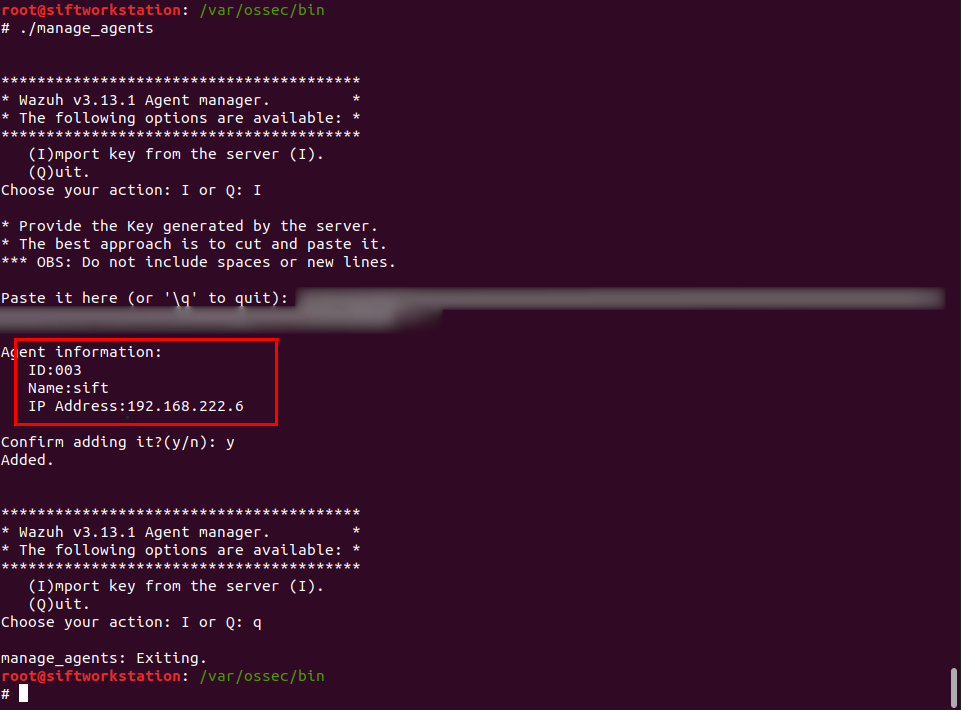
Install it the same way we did with Fleet. Wazuh is not pre-configured, so we need to do two things. First, add an agent on SOS and extract the key the same way we did in step 1 with Windows above.
After you do that, edit to /etc/ossec.conf on Ubuntu and change MANGER_IP to your SOS IP address or the SOS’s FQDN. Then go to /var/ossec/bin and execute the manger_agents binary to import the client’s data by pasting the key you extracted as shown below:
If you are interested, there is another way to do the above idea. It can be done using Wazuh registration service. It is useful when you need to configure Linux remotely using ansible for example.
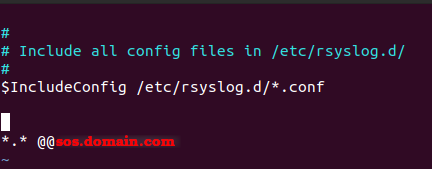
Rsyslog on Linux Rsyslog should be installed by default and the only actions you need to do are editing the configuration file then starting the service.
To do that edit: /etc/rsyslog.conf
Append a line like this if you want to use TCP connection, If you don’t want to use TCP you can use UDP by removing one of the @ characters:
*.* @@sos.domain.com
An example of /etc/rsyslog.conf after editing it.
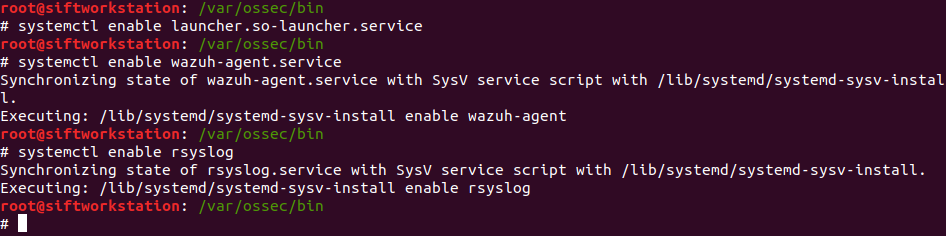
Enable all the services so when the server restarts all the services continue working.
systemcsetl enable <service name>
Expected outputs:
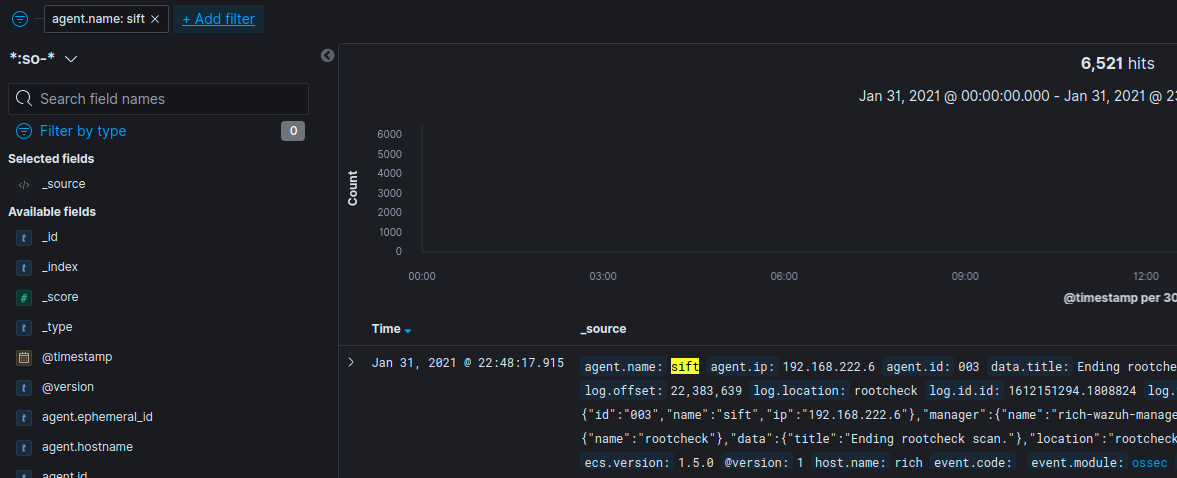
To verify, we can go to Kibana and start filtering for
agent.name = <name of the VM>
It should show us Ubuntu’s logs. In my case, the agent’s name is sift. The next screenshot shows that Ubuntu’s system logs are indeed coming from sift.
To verify that OSquery is working we can check Fleet project page on SOS and look for a new host the same way we did for Windows above.
Before moving forward, taking snapshots for all your Linux VMs and clear SOS data to start a fresh start. You can do that by executing so-elastic-clear and agreeing to the prompt message, then, take a snapshot for SOS.
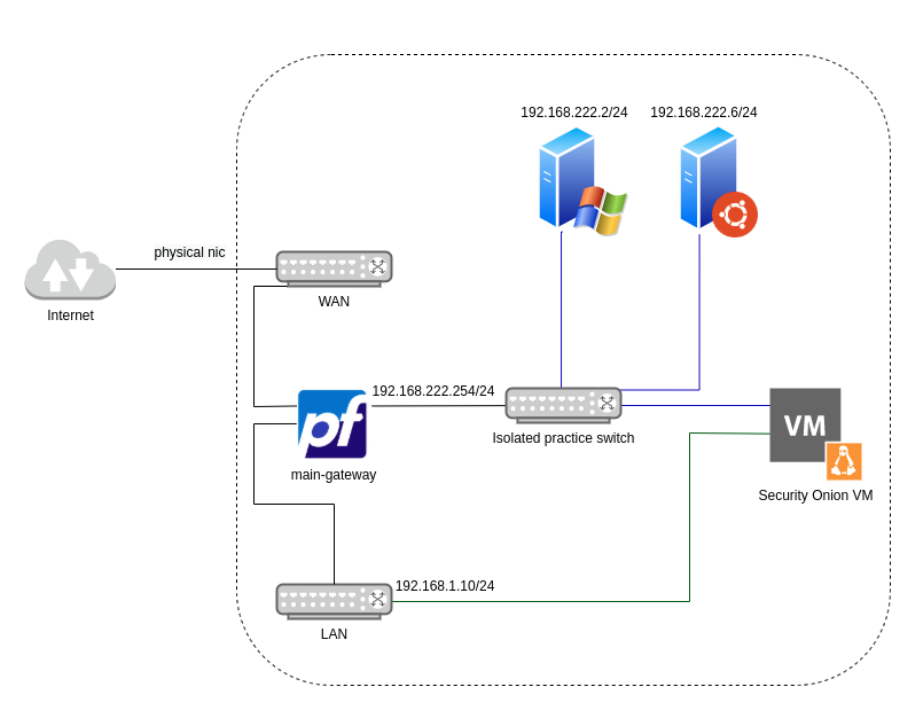
To this point, we should have pfsense connected to SOS and one Windows VMs, and one Linux VMs communicating to SOS. Whenever you want to add a new VM will need to clone one of the present VMs we just made. Depending on the malware / C2 we test, we will clone and an X number of VMs according to our needs.
The current topology should like this
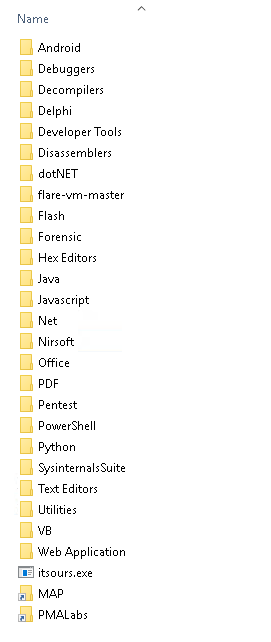
Weaponizing Windows For Windows, there is a well-known script from Fireeye that we can use to install more than 50 useful tools. Fireeye calls the script “a fully customizable, Windows-based security distribution for malware analysis, incident response, penetration testing, etc”. It’s a very good collection. The script saves so much time. Instead of downloading a list of tools, it downloads a large number of malware analysis and incident response tools. Not every single tool will be used but many of them are going to be helpful for us, so I recommend downloading and installing the script. To install the tools:
1 - Download https://github.com/fireeye/flare-vm/ repo on your Windows VM.
2 - Take a snapshot before running the script.
3 - Open Powershell as an Administrator
4 - Set script execution to unrestricted:
Set-ExecutionPolicy unrestricted
5 - Execute the installer:
.\install.ps1 -profile_file profile.json -password <current_user_password>
Installing the tools will take several minutes. It takes approximately 30 minutes, in my case.
After running Flare-VM script, Security Onion will be filled with logs and alerts, to clean Security Onion, ssh to it, and execute this command:
so-elastic-clear
In addition to the Flare-VM script, there are important tools called Sysinternals tools, which are not included in the Flare-VM script due to Microsoft Sysinternals’ license that prohibits distributing their tools as part of other scripts. In our case, we will heavily use Sysinternals tools in our dynamic malware analysis. Sysinternals Suite includes advanced system utilities. Sysinternals utilities to help DFIR practitioner and malware analyst manage, troubleshoot, and diagnose Windows systems and applications. Sysinternals has a pretty long list of valuable tools.
Sysinternals Suite
Sysinternals Suite has more than 70 tools. There are main ones like Procmon, Process Explorer, and Autoruns. Procmon is used to record the full activity of a computer for the time that it is monitoring. This is extremely useful for monitoring file systems, registry keys, processes, threads, and DLL activities in real-time. The key to using procmon is to know how to use Procmon’s filter. Procmon dumps thousands of events so to get the most of it, you need to learn how to filter for what you need.
The next powerful tool is Process Explorer. Process Explorer finds out what files, registry keys, and other windows objects processes have open, and what DLLs and Handles they have loaded, and much more. One of its magnificent features is that it allows you to check the running processes and loaded DLLs on VirusTotal. That is very useful when you deal with common malware. Finally, PE enables you to read the processes’ strings in memory. A lot of malware is obfuscated, so if you do static analysis, you will not find exciting findings but using the strings windows on PE, you will observe the strings in memory when the malware is running, which means much more data.
Another strong tool is Autoruns. Autoruns shows all programs that are configured to startup automatically when your system boots up. It gives a full list of registry keys and file locations where applications can configure auto-start settings. Autoruns is most important in detecting userland rootkits, which might be hard without using Autoruns due to the different techniques that malware use to remain inside Windows systems.
When it comes to detecting network connections, TCPView comes in the front. It’s a prettier version of netstat with GUI. It shows the system’s network connections of all TCP and UDP packets, with their addresses mapped to the process that uses the connection.
NirSoft Utilities
NirSoft also provides unique and important utilities. Many of NirSoft utilities have functionalities that exist in some of the Sysinternals tools. However, there are some unique ones that Sysinternals Suite doesn’t have. The ones I selected from NirSoft are DriverView, FolderChangesView, FolderTimeUpdate, RegistryChangesView, and ServiWin.
DriverView utility exposes the listing of all device drivers loaded. It shows the driver’s load address, description, version, and much more. It’s beneficial when detecting rootkits. FolderChangesView monitors the disk drive and lists every modification, creation, or deletion event that occurs in the selected folder. It might seem simple, which it is, but at the same time, it’s very rewarding. FolderTimeUpdate is also a basic tool. It does almost the same thing as FolderChangesView but looks for Modified Time. It can help detect files that malware touches but doesn’t restore the Modified Time. Lastly, RegistryChangesView looks for changed registry keys in the system. It does that by taking a snapshot before running the malware and compares it to the current registry keys. It can be helpful to detect malware actions since many malware disables and enables some native Windows features to help the malware establish persistence and perform its goal.
NirSoft is full of useful tools, but for now, I just mentioned a good portion of them that we would be using in future posts in this series. Flare-VM should have installed many tools, and most of them are not going to be used in this series, but it’s good to have them in your toolbox when needed.
Summary
At this point, we were able to weaponize Windows with useful tools. Both Windows and Linux instances should be isolated without any extra VMs in the network or actual device. All Windows and Linux instances should be connected to a Security Onion server. The only exit to the internet should be through pfsense, and at the same time, pfSense must have stringent rules where no external routing is allowed. pfSense must not allow any access to other subnets. The only pass rules that can be there but disabled are a rule for Windows and another one for Linux. These two rules can be enabled when we want to connect them to the internet if we wish for the malware to communicate with external servers.
External Links
Ansible playbook - SOS Agents Installation
Date: Feb 14, 2021