Applied Purple Teaming Series ( The Virtual Environment ) Part 1
This series of posts is designed to give ways for analysts to practice the combination of Red Teaming, Threat Hunting, and IR. This series will help you build a proper environment weaponized with SIEMs (security information and event management) and EDRs (endpoint detection and response) and study methods used by adversaries, incident analysis and response techniques, and tools to detect and analyze attacks, malware, and other exploits.
Many analysts practice Threat Hunting & IR using CTF challenges, which is beneficial. The extra step is knowing the underlines of infrastructures and how to work with security solutions from installing, configuring, customizing, to even breaking them. Not just that, but even more working with live malware from the wild and investigating how they function, and even trying to implement an IR plan to remediate malware.
The series will start at a low base but will skyrocket without notice, so be ready to google everything you don’t know. There are many things that I will not mention, like how you install Windows Server 19. These kinds of instructions will be skidded, assuming you can do it on your own. I will only go through the highlights or what is essential.
Virtualization
In computing, it is the ability to abstract the resources of a physical device into a virtual device. It simulates an application or software of an entire machine. It allows the installation of an operating system on the simulated machine. It allows multiple virtual machines (VMs) on a single physical machine.
Virtual Machine
A virtual machine is a fundamental part of virtualization. Virtual machines are containers for traditional operating systems, applications, or software. A VM is a set of files. Files like configuration files that describe the hardware can be used by the virtual machine and Virtual Disk files, which store information about partitions that the VM can access.
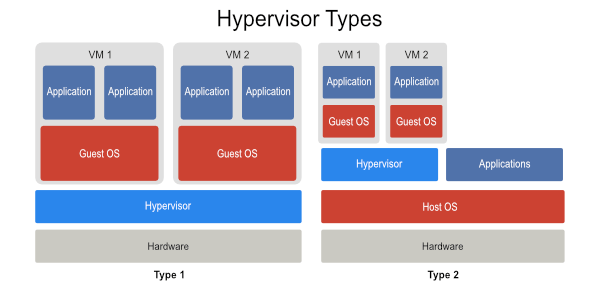
Hypervisor
In general, a hypervisor manages the physical resources provided by the hardware, memory, CPU utilization, hardware capacity, etc. Traditionally, operating subsystems would communicate directly with the hardware. In a virtual infrastructure, any interaction between the physical hardware and the guest operating systems is handled by the hypervisor. There are two classes of hypervisors, Type I and Type 2.
Networking
Virtual Machines can be Networked. The host’s network interface card allows a virtual machine to communicate with the external (physical) network. Each virtual machine can have its own IP and MAC address, and each virtual machine can appear as multiple NICs to the outside LAN.
Advantages of Virtualization
- Homogeneous Hardware Platform - Each VM operates on identical hardware, eliminating hardware dependency issues.
- Easy to replicate - To replicate a VM, all you need to do is copy the targeted VM files.
- Transportability - To move a VM from one host to another, all you need to do is move the targeted VM’s files.
- Dynamic Load Balancing -The host machine will dynamically allocate resources to the guest VMs, allowing more resources to be dedicated to those that are busy.
What is a Homelab?
A homelab is an environment at your home where you can experiment with malware and test safely. The homelab environment for most technologists includes one or more servers running a virtualization environment to support multiple virtual servers providing services.
What can you do with a home lab?
Learning how to setup and manage switches, VLANs, firewalls, routing traffic from external to internet networks, and all that stuff will give you excellent knowledge that you need as a security analyst or offensive security professional.
How can I start?
The world of home labs is a large world. It has a massive community. To start experimenting, you will need dedicated hardware for your environment. For your first server, I would suggest buying a used server or a refurbished server. For used servers, I suggest looking at eBay, and for refurbished servers, I recommend looking at SurveyMonkey options.
After finding the right option and having the hardware, you will need to install a hypervisor. For the hypervisor, good choices are ESXi, Proxmox, or just straight Libvirt on any OS. After installing the chosen hypervisor, create virtual machines, setup a pfSense or VyOS, install an internal Gitlab, and install monitoring systems. I will assume that the reader uses VMware ESXi. On ESXi we will configure pfSense, ELK, Gitlab, and Snort, Suricata, Zeek (Bro), OSSEC, Sguil, Squert from Security Onion project .I will be assuming that ESXi is installed and pfSense is connected to a WAN and a LAN network. There are many approaches to create an isolated environment for practice. I simply will give an easy-to-follow way to setup an isolated environment with a good number of VMs connected to monitor systems with the right tools that will help you practice malware analysis, IR, and forensics.
Network
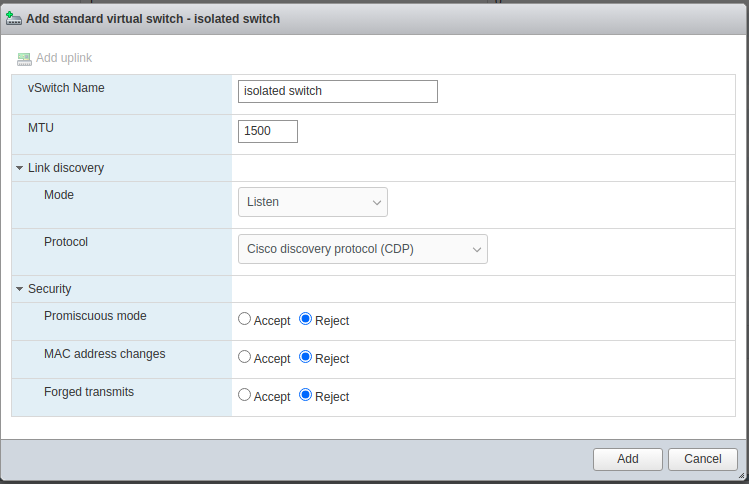
After setting up your hardware and installing a hypervisor on it, we need to prepare a new isolated environment. First, we need to create a vSwitch:
To do that, go to networking -> vswitches -> Add standard virtual switch. Make sure that all the security options are on Reject. All of them are not needed for this switch for now.
After creating an isolated vSwitch, we need to create a port group attached to the new isolated vSwitch. To do that, go to networking -> Port groups -> Add port group. Make sure that the new port group is connected to the created vSwitch above. Make sure that all the security options are on Inherit or Reject for now and add it.
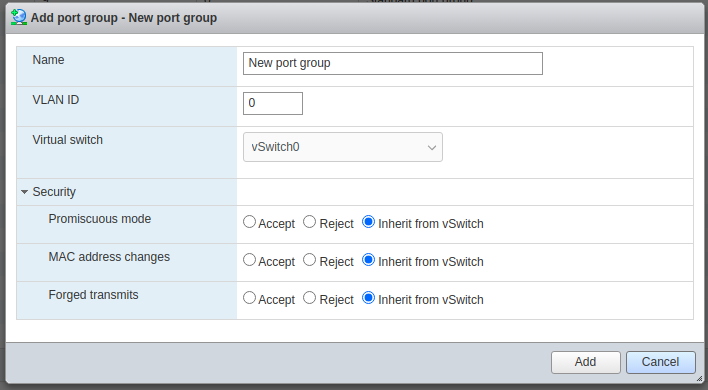
Now, create another port group with promiscuous mode as Accept so you end up with two new port groups. This second port group must be also attached to the same switch. Its job will be mirroring the targeted network. This second port group will be used later by Security Onion.
Topology
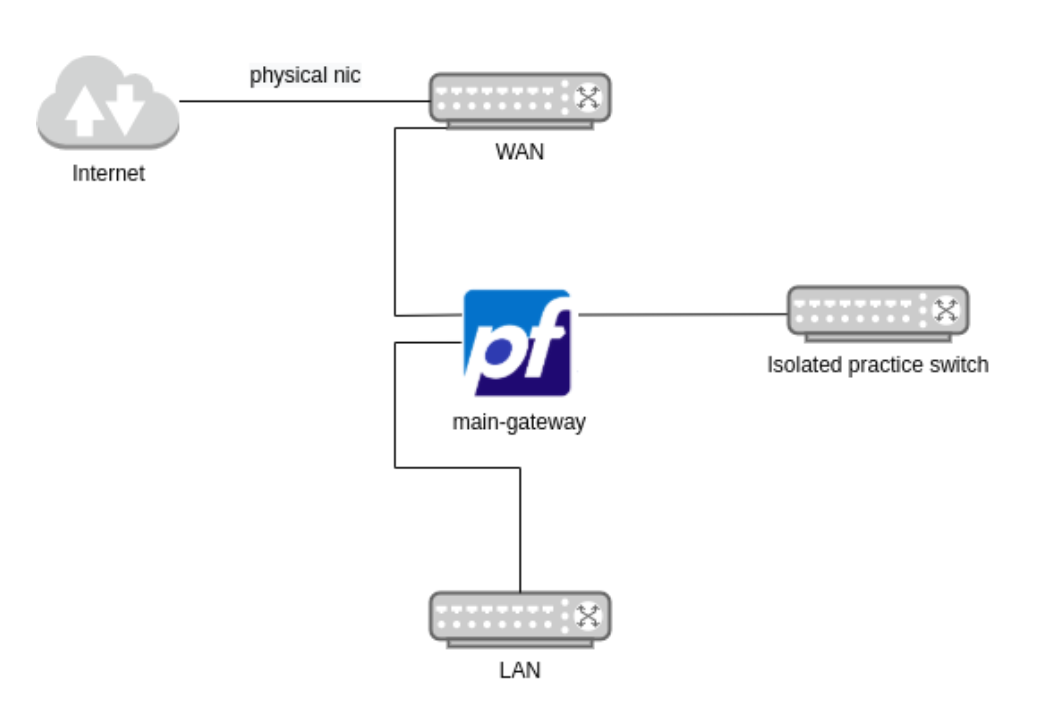
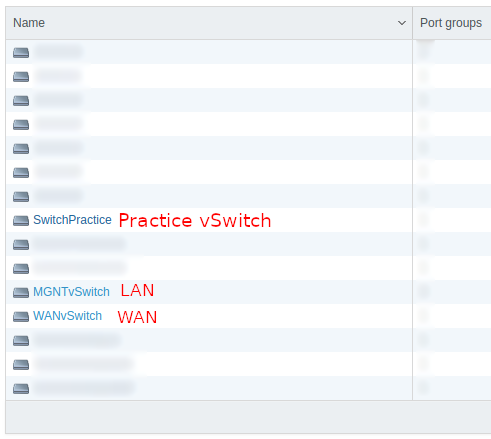
By now, we should have a new switch next to the WAN and LAN default networks on pfSense.
pfSense
At this stage, the main gateway needs to have a new network card connected to the new Practice port group. Go to Edit on the targeted VM, then Add network adapter.

Now, Map the Practice port group to the created network adapter.

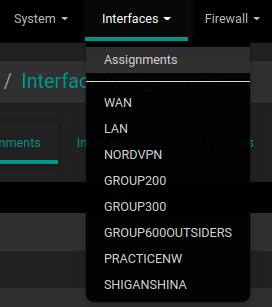
Next, pfsense needs to know about the new adapter so it starts routing and serving DHCP leases and DNS answers. To do that, login to pfsense. Go to Interfaces -> Assignments.
Now, pick the new interface you added and click add.

Then click on the created interface so you can reconfigure it.
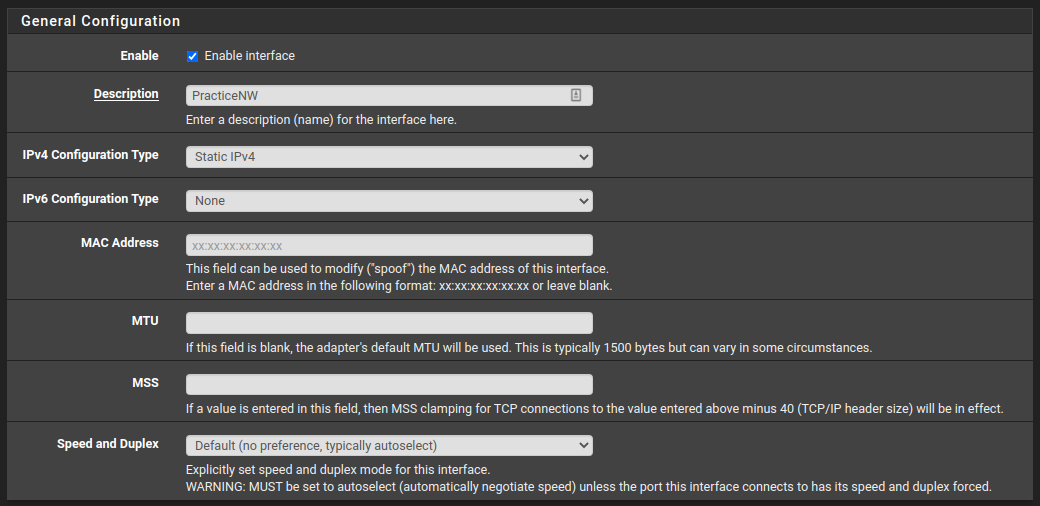
General Configuration
I would start by renaming it, and leave all the rest as shown in the next screenshot. If you want to add IPv6 to your network that is also possible from this panel.
Static IPv4 Configuration
In this section, you can enter the gateway interface you want to use in the new practice network.

DHCP Configuration
Now, let’s quickly enable and configure DHCP. DHCP is not necessary but will make your life easier dealing with new VMs. In the process, you will clone a lot of VMs when you test so it’s better to have a DHCP server giving new leases to every new VM without your interaction.
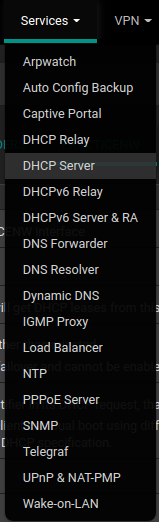
To configuration DHCP, go to Services -> DHCP Server.
Click on the practice interface you already configured in my case; it’s PracticeNW. Now, enable it and assign the range that pfsense should use. I chose this range 192.168.60.100-200.
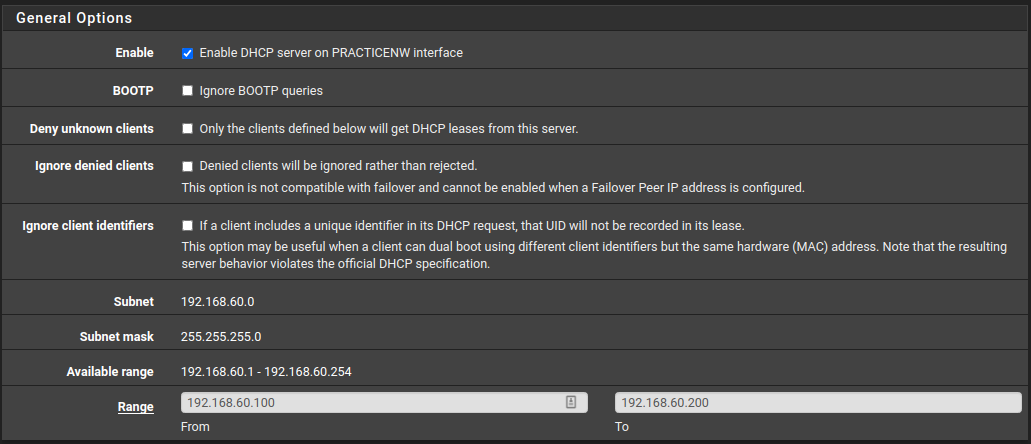
Now, pfsense’s interface has 192.168.60.254 as its IP, and it will be sent in every new lease as the gateway of the network.
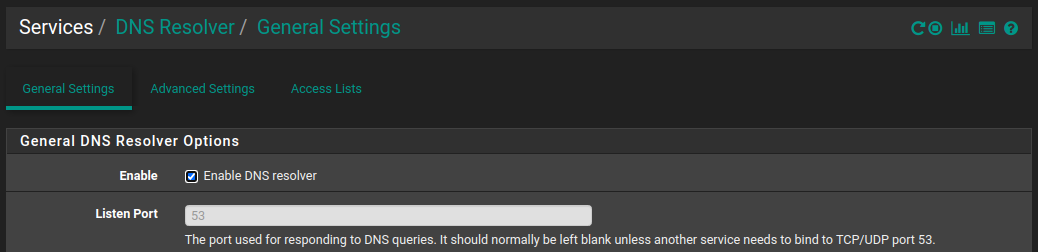
DNS Configuration
pfSense by default enables DNS on all interfaces. To make sure it’s enabled go to Services -> DNS Resolver.
pfSense Summary
Above I explained how you could add a new network adapter, assign an adapter to a specific network, and enabled DHCP on a particular range, and enable DNS. The network topology should look like the next diagram after performing the past configurations.

As I mentioned above, the idea now is to create VMs and attach them to the isolated switch. Every new VM must connect to the Practice Port Group. However, every network monitoring system must be connected to the second port group we created with promiscuous mode enabled.
Security Onion
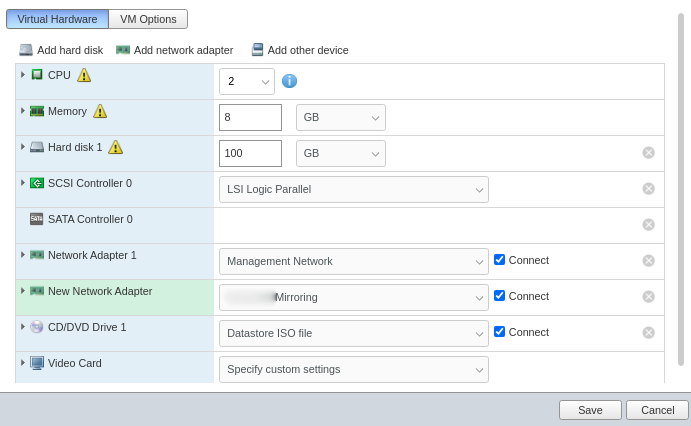
I will go over the main highlights of how to install SO 2.3.21 from an ISO image. This VM needs two adapters. A port group that mirrors the targeted network we want to monitor, in our case, it’s the “isolated” network. Another port group is also needed for the management interface. The management interface is where SO will expose its web GUI for you to access the software. This port group can be attached to your LAN network switch.
Download SO 2 ISO from SO website: https://securityonionsolutions.com/software
Create a new VM and add the ISO you downloaded to the CD Drive. Also before you run the VM. Add a new Network Adapter for the mirroring port group.
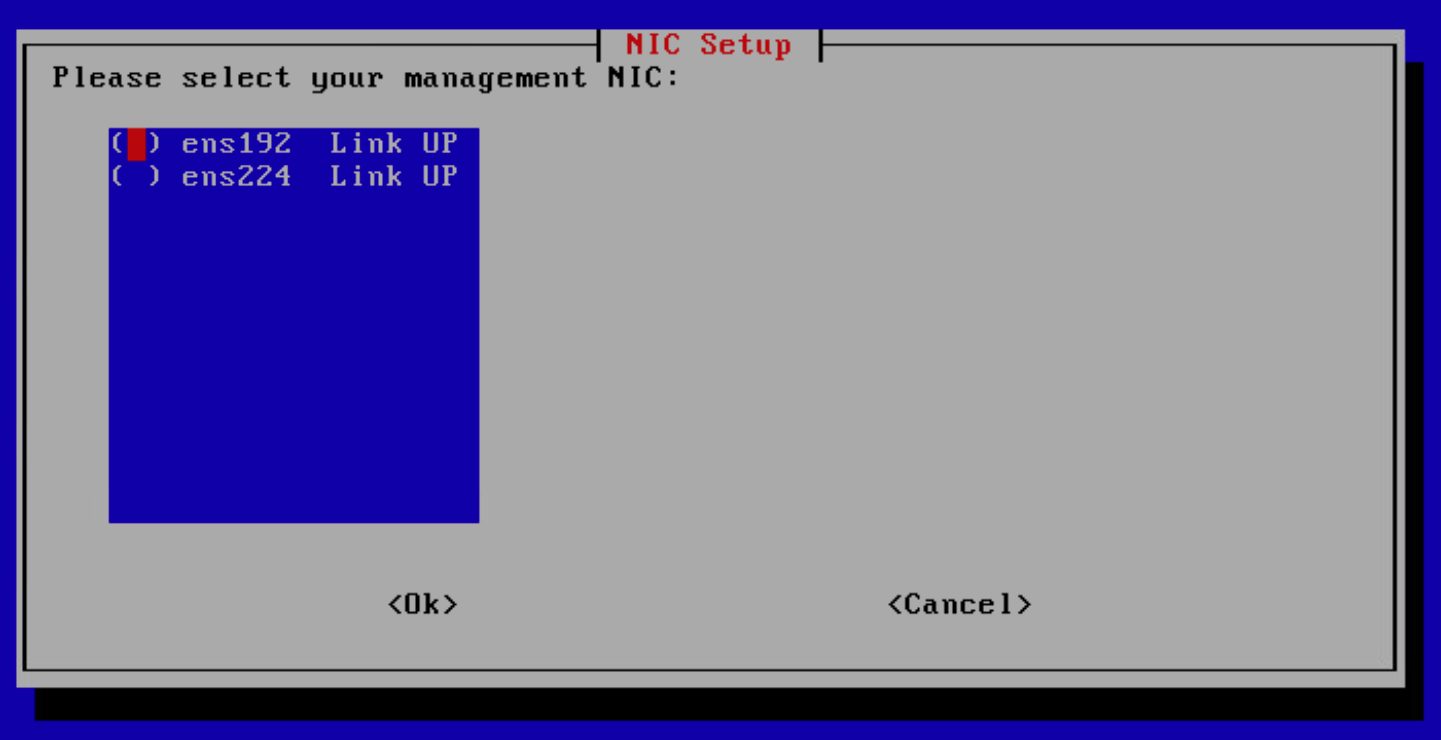
Start the VM, and then follow the instructions. Set the settings according to your needs. I will highlight some things that will be helpful. First, make sure that you don’t enter incorrect data because you will not be able to go back and setup SO currently and will start facing issues like these: https://github.com/Security-Onion-Solutions/securityonion/discussions/2399 https://github.com/Security-Onion-Solutions/securityonion/discussions/2454
So make sure you don’t enter anything unless you review it before you submit. When you reach this option, the interface with the greater number is most likely Network Adapter 2, Which is for the Mirroring port group according to the settings I used in the above screenshot. So, The management interface is ens192.
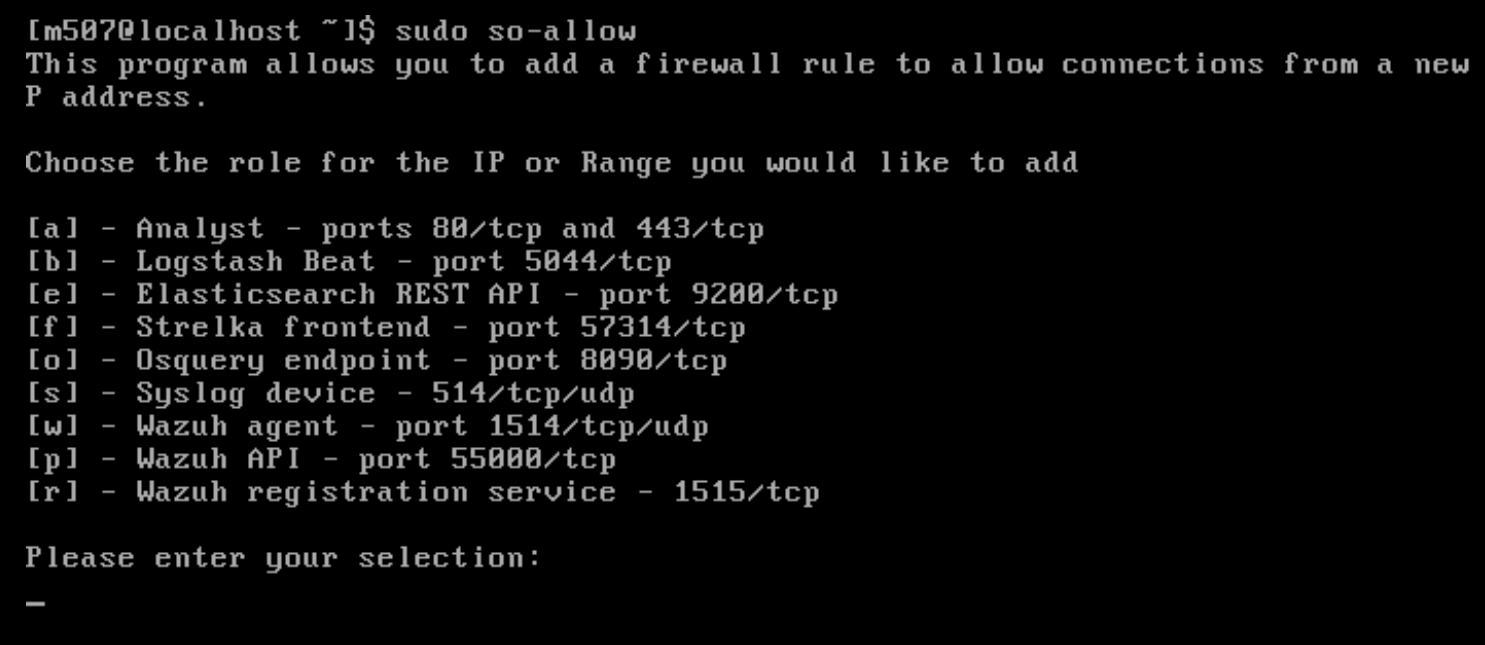
After it finishes, execute this command to add new rules for yourself to access the web GUI. Then select (a) - To add an analyst then enter your IP or a range.
sudo so-allow
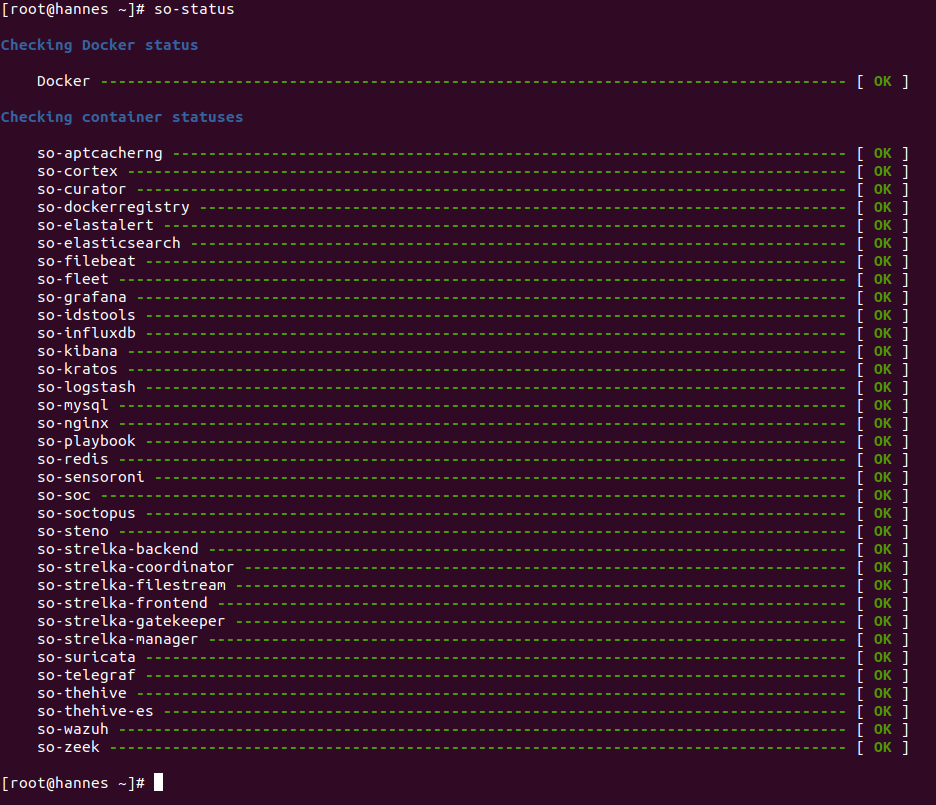
Finally, check the status of every component.
sudo so-status
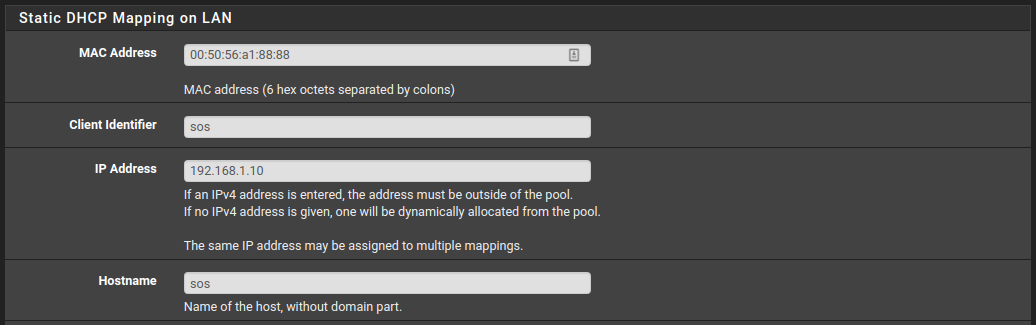
Now, you have two options. One is to setup a static IP using the DHCP server or manually from the SOS VM itself. Go to Services -> DHCP Server -> PRACTICENW . Copy the network adapter’s MAC address to assign it to a static IP address of your choice. In my case, I assigned it with 192.168.1.10 IP address.
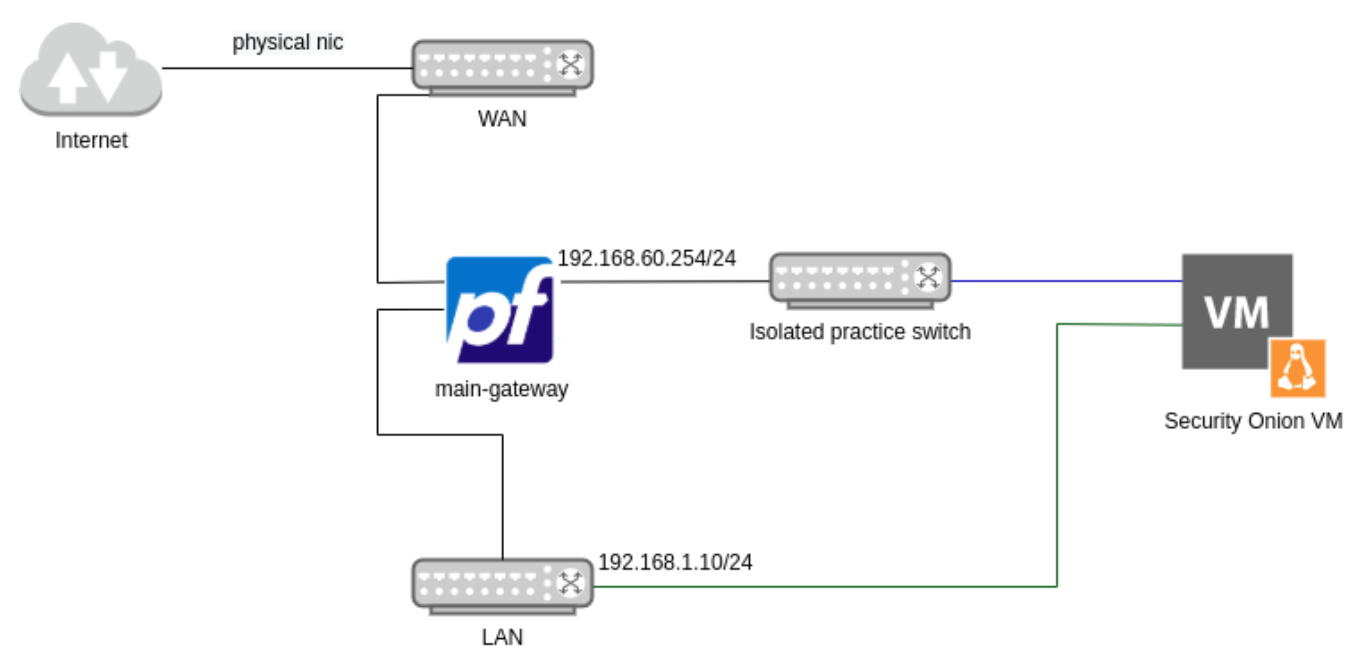
Security Onion Summary
Above I went through the highlights of how to install SO 2.3.21 from an ISO image. Added a new adapter to mirror the targeted network (the blue line) and added another port group to the management interface (the green line) where SO will expose its web GUI.
At this stage, we have an isolated network with SO. The next step is to add servers and workstations. Then we need to optimize how these VMs log their events. The way we will optimize that is by installing a Sysinternal tool called Sysmon. Then install an agent to send the VMs’ data to SO/ELK.
I will go through the process of installing Sysmon and Winlogbeats on Windows to send logs to SOS’s embedded ELK.
What is Sysmon and why is it needed?
Sysmon or System Monitor is an advance external Windows system service that monitors and logs system activity to the Windows event log. It provides more details than what Windows event log presents by default. It presents detailed information about process creations, network activities, and changes to file creation times. It helps to identify malicious or anomalous activity and understand how intruders and malware operate on Windows systems. We will use it a lot during IR and Threat hunting procedures.
To install Sysmon, start a new PowerShell window and execute the next to download Sysmon, unzip it, then install it with accepting the license’s rules:
wget https://download.sysinternals.com/files/Sysmon.zip -o Sysmon.zip
Expand-Archive -Path .\Sysmon.zip .
.\Sysmon.exe -accepteula  -i
Sysmon logs
Now, how to send Sysmon logs and Windows system logs to SOS? The agent I will use in this series is Winlogbeat. There are other agents that can be used to send logs to SOS, but for now, it’s good to use Winlogbeat due to its customizability, which will help you in future changes.
Winlogbeat
Winlogbeat is a lightweight sender for Windows event logs. It runs as a Windows service and sends windows event log data to Elasticsearch or Logstash. It will be used in our environment to send all Windows logs to SOS.
Download and install Winlogbeat from: https://www.elastic.co/downloads/beats/winlogbeat
Go to where you installed it. In my case it’s C:\ProgramData\Elastic\Beats\winlogbeat
In Powershell, copy winlogbeat.example.yml and name it inlogbeat.yml
cd C:\ProgramData\Elastic\Beats\winlogbeat
cp .\winlogbeat.example.yml .\winlogbeat.yml
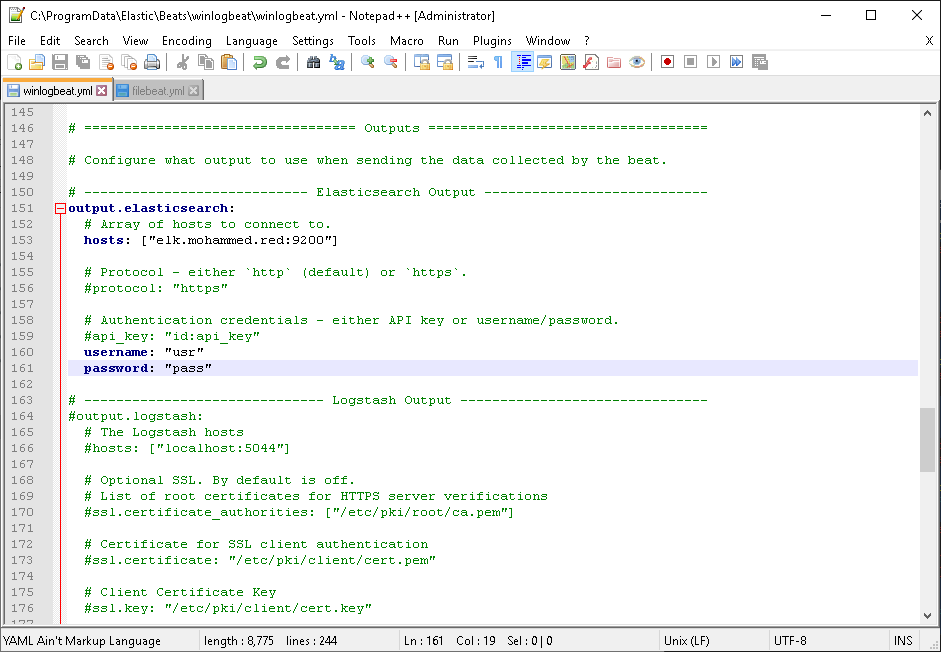
Open winlogbeat.yml on an editor and look for output.elasticsearch. Under it, you will find hosts add your elk IP or domain there. Uncomment username and password and add the values of your writer user.
Note: in enterprise environments, this is not the best way to send data since all the sent logs are unencrypted.
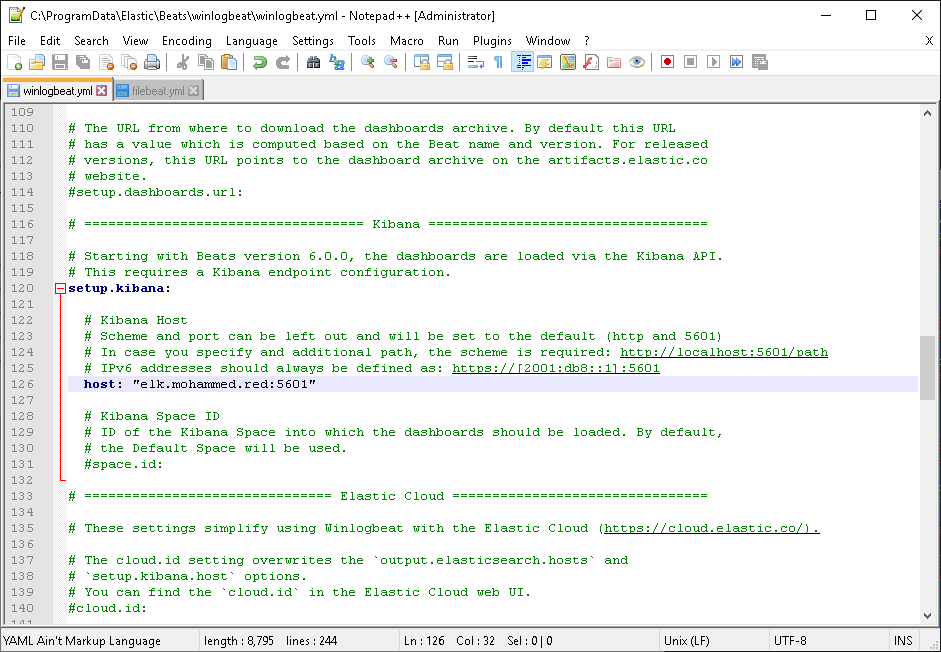
Then look for setup.kibana. Under it, you will find host. Uncomment it and add your ELK IP or domain there.
Save the file and then run the service. You can run it using this command on Powershell:
Start-Service winlogbeat
Or from Services shortcut.
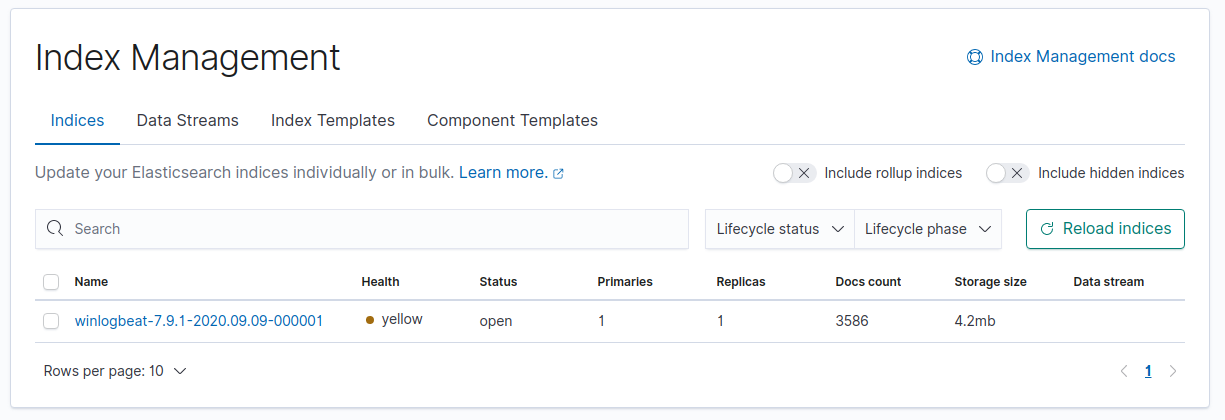
Then to verify that it’s working. Go to Stack Management > Index Management .
Or just go to this link http://yourdomainorip.com:5601/app/management/data/index_management/indices. You will find a new entry has been created by winlogbeat.
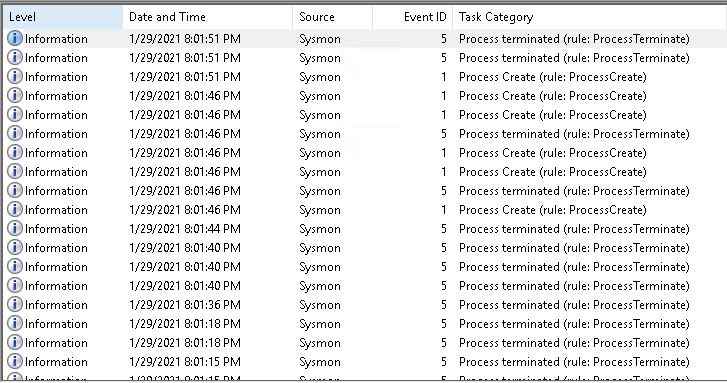
From the Discover angle, you will find all the windows VM events you previously had:
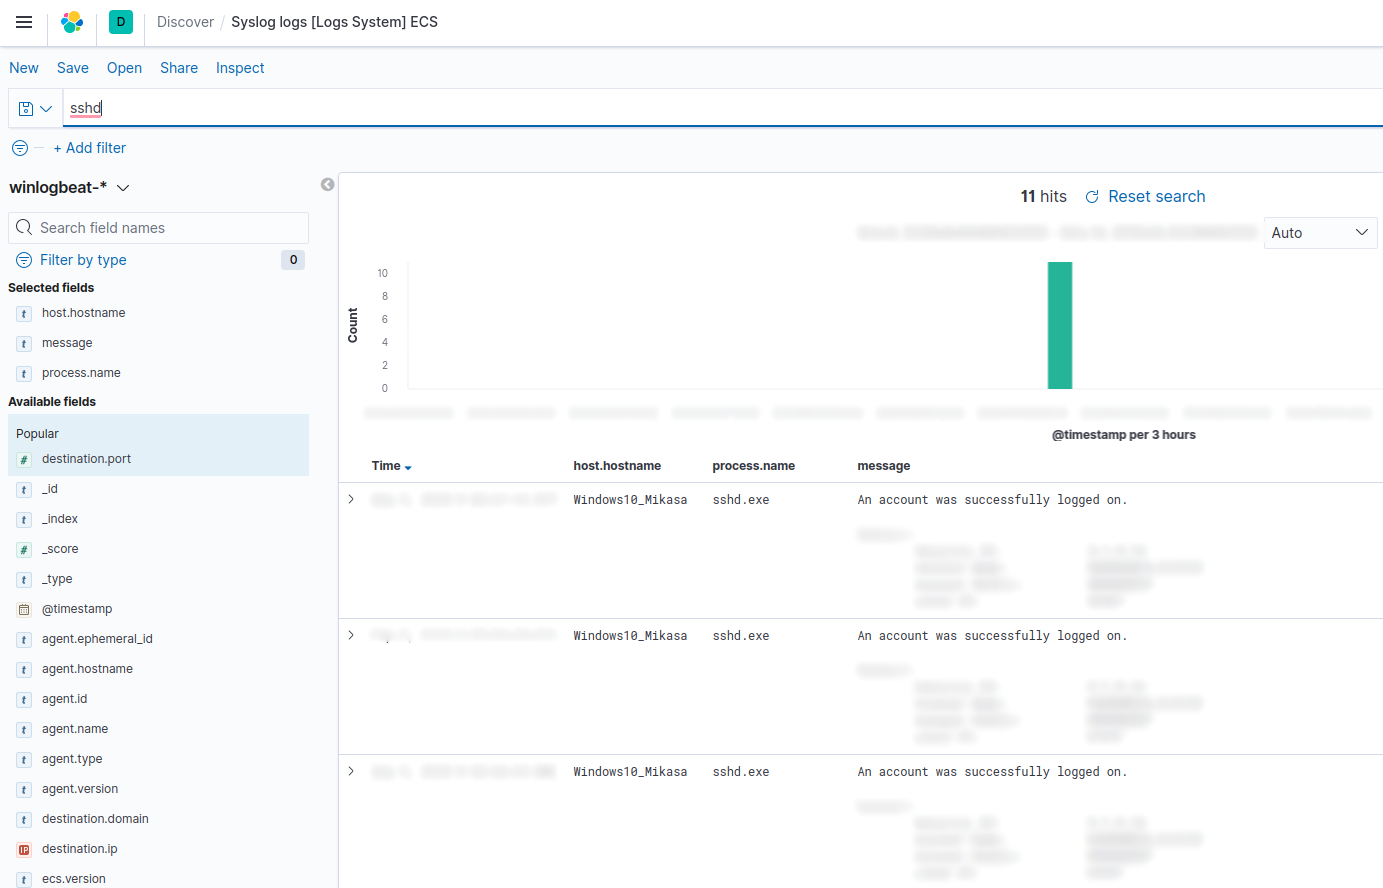
Now you will collect all your VMs logs in one place.
Summary
In part 1, we learned how what virtualization is, visualized how an isolated network should be, then applied that using VMware vSwitches and then configured them in correlation with pfSense. In pfSense, we configured DHCP, DNS, and Firewall in pfSense. Then, installed and configured Security Onion with the proper firewall rules. Finally, we optimized the Windows VMs event log using Sysmon, then installed ELK’s agent, Winlogbeats, to communicate with ELK in SO and ELK to receive Windows data.
In part 2, we will cover Kolide Fleet, OSquery, and Wazuh agents’ configurations on Windows, Ubuntu, and SOS server, structure pfSense, and Security Onion Solutions firewall rules weaponize each instance with convenient tools for malware analysis and incident response practice. All that will be covered in detail; stay tuned for the next part.
Date: Feb 7, 2021